menu

WebPlatform Documentation

Home - Listloader

download

Why use Listloader?

To transfer data from an excel spreadsheet into a database

  • Calling System
    • Then you can set callbacks
    • Agents will see this data and be able to call and take results
    • You can report back to our client
  • LeadTracking Lite
    • Then you will see the leads
    • Agents will be able to progress these leads through the sales cycle
    • You can report back to our client

In Listloader you will be setting up the database requirements [mapping fields in tables & determining how the system will spot and remove duplicates], so know your database!

Listloader Overview: What happens?

What happens after a load?

  • For all campaigns: see how many files were uploaded
    • Status for each upload
    • Date & time loaded
    • Number of sites/contacts added & updated
    • Config file [contains the detail of your mapping]

Getting the best out of Listloader

Best practise: Ground Rules

Getting the most out of Listloader

  • Do not rush your work: Garbage in – Garbage out
  • Use the correct template – checkpoint what & where’s the current template?
  • Check data is in the correct columns
  • Check that you have not exceeded the character lengths in columns
    • Refer to the “EIMSStandardValues” worksheet in the data load template
  • Check that all mandatory columns are populated [based on campaign]
    • If you attempt to load a file that has empty columns in the middle of the file, Listloader will initially process it up to the data break point [empty column].
    • If one of your mandatory fields is beyond the data break when you get to Source Deduplication stage you will not be able to proceed, every time you click ‘Next’ you will be taken to the edit deduplication options pop-up where you can see that column matching for the mandatory field is empty
  • Check that you do not have empty rows in the middle of your data
    • If you try to upload a file with empty rows Listloader will process all data up to the data break point = your empty row.
  • Know your data [to make right decisions for mapping and dedupe settings]
  • Use Previous instead of back button

Your experience whilst using this tool is determined by the quality of your data

  • If all checks above are done, you should have no errors [or minor ones which are quick to fix within the tool e.g. Number of employees/Turnover aligned with fixed list of values]
  • Time to load your data should be minimal
    • File specific: If you have many duplicates you need to accommodate for the time it will take to review these & enhance master records
  • Help wiki content available on all pages for refresh/just in time training!

What Listloader can do

Reduce data format time

  • If you do all the checkpoints in the Best Practice slide you can be loading data a few minutes post receipt, especially if you:
    • Check that you have not exceeded the character lengths in columns
  • Do your deduplication [removal of duplicates] within the new Listloader

Altogether remove data format stage

  • If the file you have does not require any attention
    1. You have nothing to concatenate
    2. Character length in columns is not an issue
    3. The data is all supplied following the same format throughout
    4. –Company Name, Country, Phone Number, Address line 1, Contact details same from start to end of the file
  • You can upload the file as is and map to the system database fields
    • The system will be able to match records if the data supplied allows it to [point 3 above]

Checks before you load data

Data format checked

  • You have sign-off on the data format checklist
  • Column length checks done
  • You have no duplicated columns or blank columns in the middle of the data

Data format in correct template

  • Check that you are using the latest template
    • Easy visual check as it should have Organisation Name & Source Organisation ID

Listloader: Loading Data [For Standard: Lead Gen & TLV]

Create List Load

Note: Steps visible & action buttons in action bar at the top of the pages

Step by Step: Create List Load - Target Destination & Source File Upload

Actions you need to take at this stage:

Selection of Destination

  • Campaign database you want to load data into
  • The list you will see will match the campaigns you are assigned to
    • You can assign yourself to new campaigns through the Campaign Assignment tool

Selection of Destination Tables

  • Marketing List [used for Lead Generation]
  • Leads [creates projects, used to upload leads into LeadTracking Lite]
  • Webleads+ [creates projects by contact, used for WL+, also means that in CIAB Wizard you must have this Type of Campaign selected]

Browse for Source File & attach

  • Your ‘Source file’ is the data you want to load [should be in the standard location on the network for your campaign]
  • Once the ‘Source file’ is uploaded you will be able to see the file name
  • You can delete and replace the file if you have made a mistake or go back to this page to double-check…
  • The latest template can also be downloaded here

Selection of Sheet

  • Select the worksheet that contains the data to add to the database within the uploaded file

[files generally have multiple tabs so make sure you select the correct one here]

Step by Step: Create List Load - List type & title

Actions you need to take at this stage:

List Loader [non-editable]

  • The system will automatically identify the user that is loading a data file [user that is logged in]

List Owner

  • Allows selection of another person/user if you are not the owner of the destination database
  • You can be loading on behalf of another user

List Type, select one of:

  • Suspect
    • Newly purchased data, cold calling data
  • Prospect
    • Leads from another source, generally pre-qualified
      • Webleads, Marketo leads, Event attendees
  • Exclusion List
    • List of Organisations/ Companies/Contacts you want the system to exclude from the database
  • Title [File name]
    • Make it relevant to the needs of your upload / campaign

Step by Step: Create List Load - Segment list name & batch value

Actions you need to take at this stage:

  • Segment List Name
    • Maps to the Standard Progress by List report
    • Make it relevant – meaningful to the client
  • Batch Value
    • Pre-populated with the name of the Source File
    • Maps to call back manager, pre-populated with Source File name & editable
    • Make it relevant: You can change to suit the needs of your upload/campaign
  • Description for file that is being uploaded
    • Be as descriptive as possible for future reference*:
      • Make a note of the Source file name
      • Identify Vendor the data was purchased from
      • Note the purchase criteria [segmentation info]
      • Note the expiry date for the data
    • Note: Back to list button [will take you back to the list management page where history of loads displays]

Step by Step:Create List Load - Confirm Campaign

Confirmation of the campaign database

  • Campaign Name
  • Client Logo display

Note: The importance of having the logo uploaded in EIMS Manager

  • Listloader may not work!
  • Automated leadsheets will not include the Client logo!

What you need to have done to see your Client’s logo:

  • In the ‘Client’ page for the campaign database in EIMS Manager:
    • Images must be 250 pixels wide by 200
    • pixels high
    • The file size must be less than 350kb
    • The format must be bitmap
    • Library of company logos: K:\Setup\_Client Company Logos

Listloader: Data Mapping [For Standard: Lead Gen & TLV]

Data Mapping

Listloader has default mappings for all type of campaigns

If you have used / or wish to use a default mapping:

  • You will not be able to change the mapping (source and destination data columns) – these are read-only!
  • You will not be able to make changes to any of the validation rules or transformations – these are read-only for a default mapping!
  • You will be forced to create a new mapping (thus protecting the integrity of the default mapping)
  • If you select a previously saved mapping from the mapping definition, it will load and you can just click next to move to the processing stage

Step by Step: Data Mapping

What you will see at this stage:

  • Breadcrumbs at the top of the page
    • Sections with hyperlinks allow you to go back to those
  • See Title of the file you want to load
  • ‘Your Source’ section where you can see a snapshot of the file you want to load [Your Source]
    • This does not load by default
    • If you want to see a snapshot of the data click on the ‘Preview Raw Data’ button
      • Preview data from source & expand rows
      • If this is not what you expected just change the sheet!
      • Click on the breadcrumb link to ‘Create Load’ & change the sheet in the dropdown list

Actions you need to take at this stage:

  • Start with knowing your database!
  • Select/Confirm a mapping. Your options are:
    • You can save a new mapping & name accordingly
    • You can use the default mapping for your campaign as is, but you will need to 'Save as new mapping' for your campaign [default mappings are read-only by default and disabled for selection]
    • You can re-use a previously saved one in the list
    • You can improve any mapping, just ‘Save Mapping’ when you have changed it to save for re-use for a future load
  • Check that data is correctly mapped
    • Start by understanding what everything means so that you know what you’re doing…
      • Source Data Columns = data columns in your source file [the one you want to load]
        • In the dropdown list you will see the names of the fields/headers for columns in your source file
      • Destination Data Columns = data columns in your target destination [database you want to load the data into]
        • Listed for each table you will see the fields you can map data into
      • Tables = based on your selection for ‘Destination Tables’ in the Create List Load page you will see: Contact, Site, Company, Project, Organisation
    • Go through the Source Data Columns and make sure all have been mapped to their respective Destination Data Column
      • Refer to the EIMS Standard Values in your Listloader template for help
      • Check your reporting requirements. If you need to pull data from the database it needs to be in the right place to begin with…

Then all you need to do is select the fields you want to map to each of the 4 tables and Save your work

  • Organisation section [Name or ID] is mandatory!

Create & edit a rule. Rule types available:

  • Validate this column against a list of items [manual list]
    • E.g. Where you do not want blanks = Must be populated
  • Validate this column against another column [lookup list]
    • E.g. Where you have lookup lists from CIAB or Custom Set Up that your data must comply with = COUNTRY, EMPLOYEES, TURNOVER
  • Transform values in another column based on this column
    • E.g. Transform a value in one column based on the data in the column field where you are creating the rule = Transform value in COUNTRYCODE column based on this column [Country]
  • Transform values in this column
    • E.g. Where you can configure the transformation you want manually = Transform ‘UK’ into ‘United Kingdom’

Manage rules & View all Rules

Once all rules you want to apply to the data have been set up

  • Use the functionality available: Edit, Remove, Order [move rules up/down - so that these are applied to  the data in the order you determine]

For a Field e.g. COUNTRY

View all Rules

Edit Rules (Transforms)

When a rule is set up you can configure it. This will normally apply to rule type = Transform.

What to do:

  • Click 'Edit' in the grid
  • Then click on 'Configure Transform'
  • The settings will load, you will see what each value was set to transform to
  • You can edit, add, delete settings
  • Save when you have finished editing.

Edit Rules (Validation)

When a rule is set up you can configure it. This will normally apply to rule type = Validation.

What to do:

  • Click 'Edit' in the grid
  • Then click on 'Configure Validation'
  • The settings will load, you will see which values are set to allowed or disallowed
  • You can edit, add, delete settings
  • Save when you have finished editing.

Save a mapping

  • Save updates to an existing mapping, just click on ‘Save Mapping’
  • Save a new mapping, click on ‘Save New Mapping’, give your mapping a name & Save. The screen will refresh and your new mapping will be the option visible for ‘Select Mapping Definition’ at the top of the page.
  • Save Mapping = you will be saving any changes made to the mapping that is currently selected in ‘Select Mapping Definition’ [at the top of the page]
  • Save as New Mapping = you will be saving a brand new mapping for this campaign database

It is advisable to update the ‘Validation Rules / Transformations’ section before you ‘Save as New Mapping’

Now: When you move from the data mapping stage you can see the processing stage

Step by step: Data Mapping - Validation

What happens at this point of the load:

  • Validation: Loading
    • Where Listloader will apply the rules & transformations that were used for the load

Actions you need to take at this stage:

  • Show Detail
    • Will show you the log of errors in the validations
  • View Transformation Log
    • A grid will show you what has been transformed in your data by Column [Field], Old Value, New Value
  • Correct Invalid Rows [click on View Rows]
    • An excel document will download with detail on:
      • Failed Rules [and identify which fields have failed for each row of data]
      • Truncation errors [where the data in the Source file exceeds the number of characters supported in the   field identified in the error column]
  • You can make the decision to correct the issues in:
    • the next stage [Data Visualisation]
    • the Source file [re-upload fixed file in Create List Load page]

Note: Use Previous instead of back button

Listloader: Data Visualisation & Cleansing [For Standard: Lead Gen & TLV]

Step by step: Data Visualisation & cleansing

What you will see at this stage:

  • Breadcrumbs at the top of the page
    • Sections with hyperlinks allow you to go back to those
  • See Title of the file you want to load & Total records mapped
  • A grid with the destination tables & columns
    • Count of populated records
    • % of populated records [This information is valuable as it allows you to make a decision whether you have enough data that if fit for purpose]
      • E.g. For an email blast or webleads you expect 100% data in the ‘EMAIL’ column OR Reset client expectations as these will need to be sourced for us to deliver the message to the contacts
      • E.g. For Telemarketing you expect 100% data in the ‘TELEPHONE’ column OR Reset client expectations as these will need to be sourced for us to reach the contacts
      • E.g. For webleads you expect 100% data in the ‘DIRECTTELEPHONE’ or ‘TELEPHONE’ column [based on mapping] – Stop the load and contact your  supplier! This is a MANDATORY field…..
  • Visualise / Transform action column
    • From where you can edit the data in each field and make corrections [columns with errors will be highlighted in red]
  • Invalid row count will display if you have not made your corrections in the Source file
  • Action buttons: View Transformation, Back to List, Previous, Next

Actions you need to take at this stage:

  • For the columns highlighted in red in the grid
    • Click on Edit, Select the values which are incorrect
    • Type the ‘New Value’ [this is the value you want in the database]
    • Click Update – your values have been corrected!
    • Repeat for all incorrect values in the column

Example on screen for Number of Employees where it is so easy to drag values incorrectly in a data format and go unnoticed….

To fix this issue:

  • Selected all values above 1000
  • Added New Value = More than 1000 [as in EMPLOYEES lookup]
  • Clicked Update
  • The correct count for value = More than 1000 has increased from 60 to 272 & the incorrect values are no longer visible in the list

Then I proceeded to fix the other incorrect value, selected it

  • Added New Value = 500 to 999
  • Clicked Update
  • The correct count for value = 500 to 999 has increased from 60 to 116 & the incorrect values are no longer visible in the list
  • My list is now cleansed, so I can ‘Close’ the pop up

Once all cleansing is completed, click Next to proceed

Listloader: Source Deduplication [For Standard: Lead Gen & TLV]

De-duplication explained...

This is so that you have an idea of what happens.

Step by step: Source Deduplication 

What you will see at this stage:

  • Breadcrumbs at the top of the page
    • Sections with hyperlinks allow you to go back to those
  • See Title of the file you want to load

Start by understanding what everything means so that you know what you’re doing & know your data!

The 'Edit De-duplication Options' pop up will load

(it applies in both de-duplication stages: Source & Target)

  • Source de-duplication Options – where you can determine which fields [within the tables] the system needs to match in the data to identify duplicated records & which criteria the system must follow
    • Quick Presets [default Preset 1- Exact match]
    • You can also select a % of match
    • Dedupe method [first x chars or fuzzy]
    • Merge method [None or Merge data from duplicate missing in Master]
    • Source De-Duplication [First record is Master or Most populated record is Master]
    • Column Matching [where you can select which fields you want the system to match the data for]
      • Organisation table must be populated [Name or ID]
      • if you select a duplicate field & click ‘Save’ the fields that error will be highlighted in red.
      • You will not be able to Save until the error is fixed [you must change the selected field or blank it out]
    • Grid [where you can see the data for the fields selected in column matching, up to a maximum of 5]
  • You can also tell the system to use the deduping algorithm/setting for the first x characters in a column
  • When you add more columns to ‘Column Matching’, Quick Presets changes to ‘Automatically selected when ………’
    • Organisation must be populated for Lead Generation & TLV campaigns
  • Grid [where you can see the data for the fields selected in column matching, will show the first 5 columns selected]

Note: The total number of columns will be visible the Source De-duplication page once saved [in this example there are 8 columns]

Step by step: Source Deduplication - Method

The Source de-duplication Options have now changed from 6 columns [default] to 8 columns [customised]

Source de-duplication Method – where you tell the system whether you want to have access to the output of the Source Deduplication or if you want to skip it altogether

  • Auto [you’re telling the system it can apply the Source de-duplication Options and you do not want to see the output]
    • E.g. Applies to Webleads+ data files because this stage is  automated in the default mapping
  • Manual Browse & Review [you’re telling the system it can apply the Source de-duplication Options and you want to see the output so that you can further enhance master records if possible]
    • E.g. Applies to Lead Generation data files
  • None [Skip De-duplication] [you’re telling the system you want to keep every record in the Source file, no deduplication required]
    • E.g.   Applies to project uploads [qualified leads for LeadTracking Lite]

Method = Manual browse & review

  • Select method =Manual Browse & Review
    • Click Analyse
    • Listloader will let you know if duplicates have been found
    • Tick ‘Show complete matches’
      • The list of duplicates found will load
  • In the grid you will see:
    • List of columns [by table column name]
    • Duplicate record
    • Master Record
  • Actions you can take:
    • Navigate between records using the arrows
    • Select the value[s] you want to move to the master
      • Will be highlighted in green in duplicate record
    • Click on the merge with master icon
    • The data has been merged notification will appear
    • Click OK
    • The data will be successfully merged into the master!
    • Click Next, you will see a Campaign Confirmation pop up, then click Yes

Confirm the campaign you are loading data into

This is your last chance to verify you have not made a mistake, from this point onward you cannot 'undo' your actions. Make sure the campaign name in the pop up is the correct one

Step by step: Source deduplication - Data import

What you will see at this stage:

  • Breadcrumbs at the top of the page
    • Sections with hyperlinks allow you to go back to those
    • You only be able to go back to Create Load or Map
  • See Title of the file you want to load

At this point of the process your data will be moved to a staging area in preparation for the Target Deduplication

Note: When the Data Import is completed you will not be able to return to any previous stage of the loading process.

Listloader: Target Deduplication [For Standard: Lead Gen & TLV]

Step by step: Target Deduplication

What you will see at this stage:

  • Breadcrumbs at the top of the page
    • You will not be able to go back to any other stage of the load at this point – point of no return!
  • See Title of the file you want to load

Edit the Target de-duplication Options – where you can determine which fields [within the tables] the system needs to match in the target database to identify duplicated records & which criteria the system must follow

  • Know your database so that you set the correct options!
  • Organisation table must be populated [Name or ID]!

Choose the Target de-duplication method you want the system to apply to the data

  • Auto [you’re telling the system it can apply the Target de-duplication Options and you do not want to see the output]
  • Manual Browse & Review [you’re telling the system it can apply the Target de-duplication Options and you want to see the output so that you can further enhance master records if you can]
    • You will be able to see the duplicate record, compare against the Master record [enhance the Master record] and confirm whether you are happy the two records are duplicates.
  • None [Skip De-duplication] [you’re telling the system you want to keep every record in the Source file, no deduplication required]
    • Every record in the file will be imported into the target database [irrespective of being a duplicate if that is the case]
  • Next will take you to the Data Import [where the source file will be added to the Target database]

Listloader: Data Import Evidence - List Management / Reports [For all types of load]

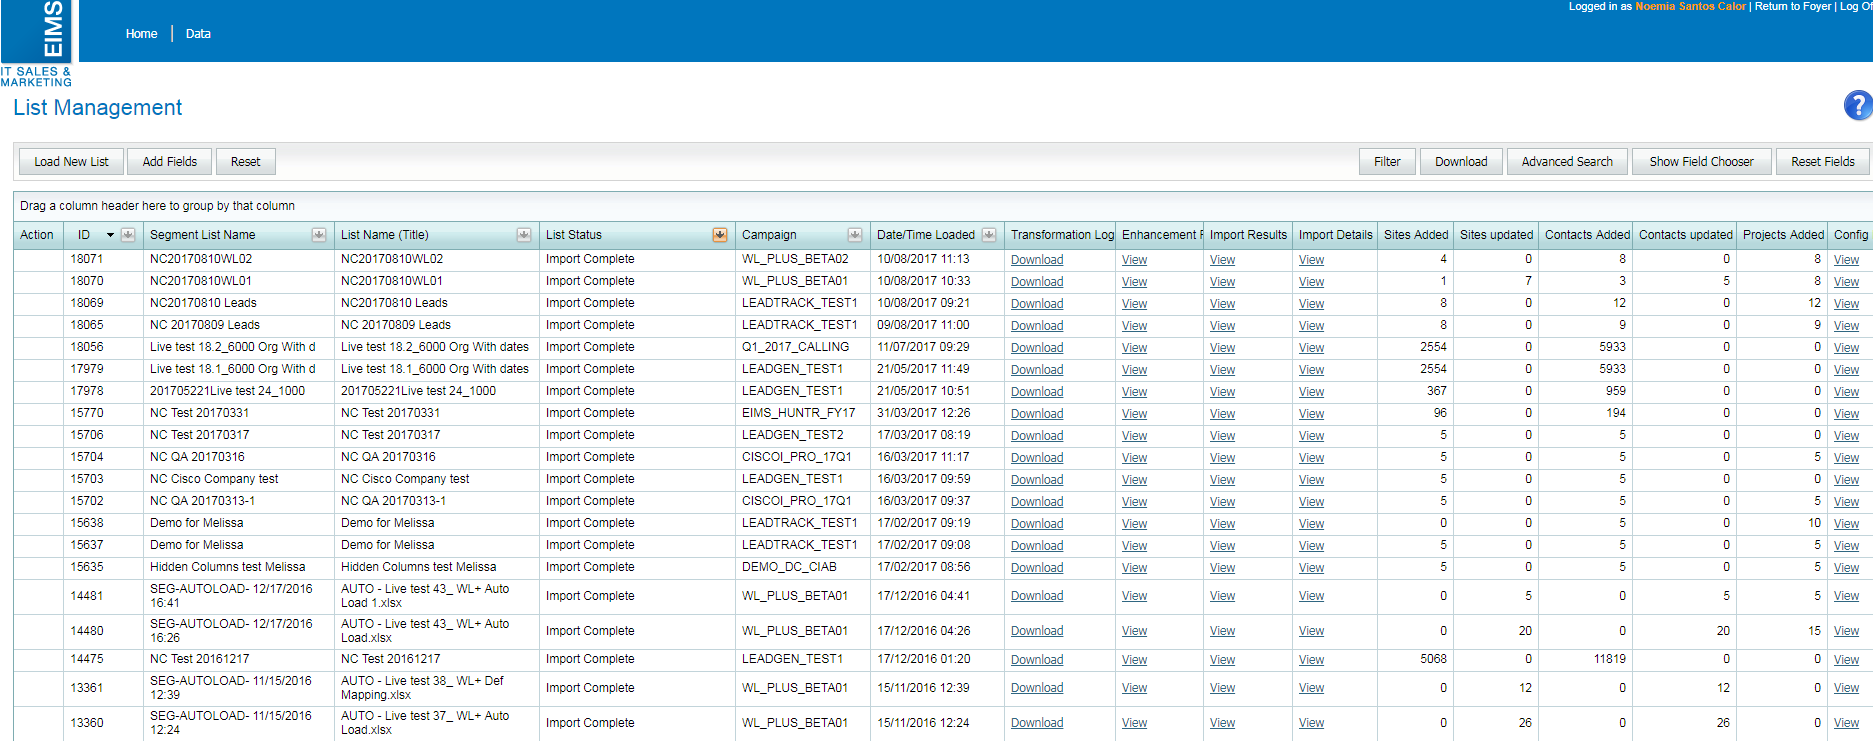
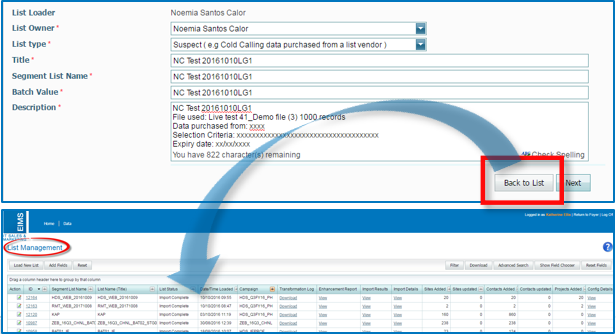
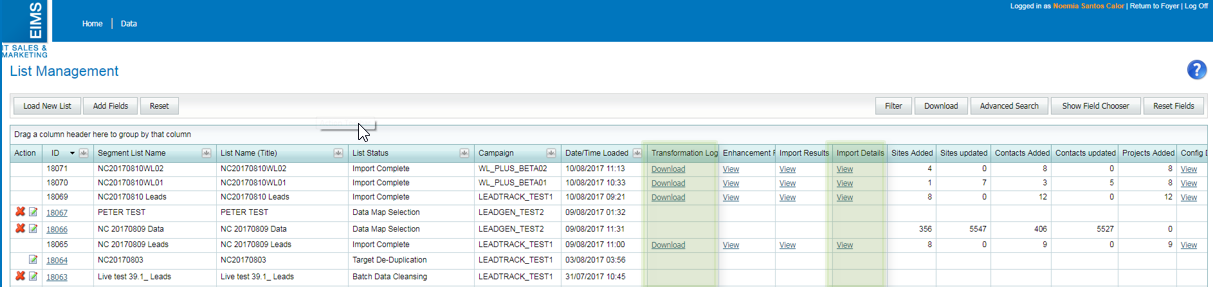
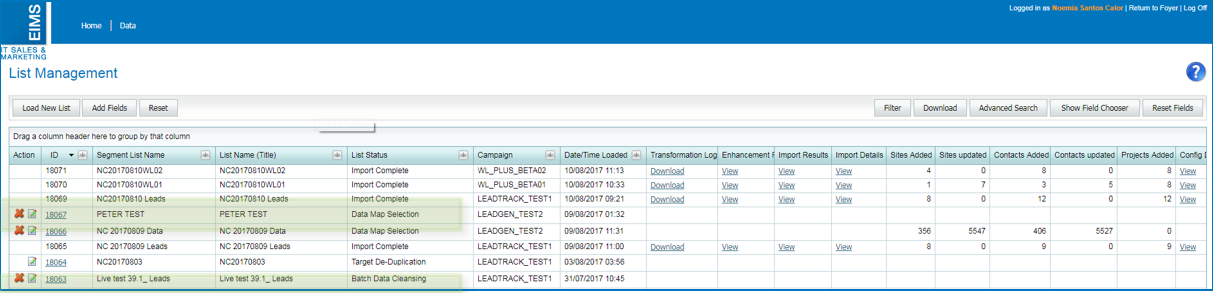
Step by Step: List management - Status of loads & reports

For all campaigns see the files that were uploaded

    • You can use standard FSG functionality on this grid [filter, search, group]
  • Status for each upload = List Status
  • Date & Time loaded
  • Number of Sites/Contacts/Projects added & updated
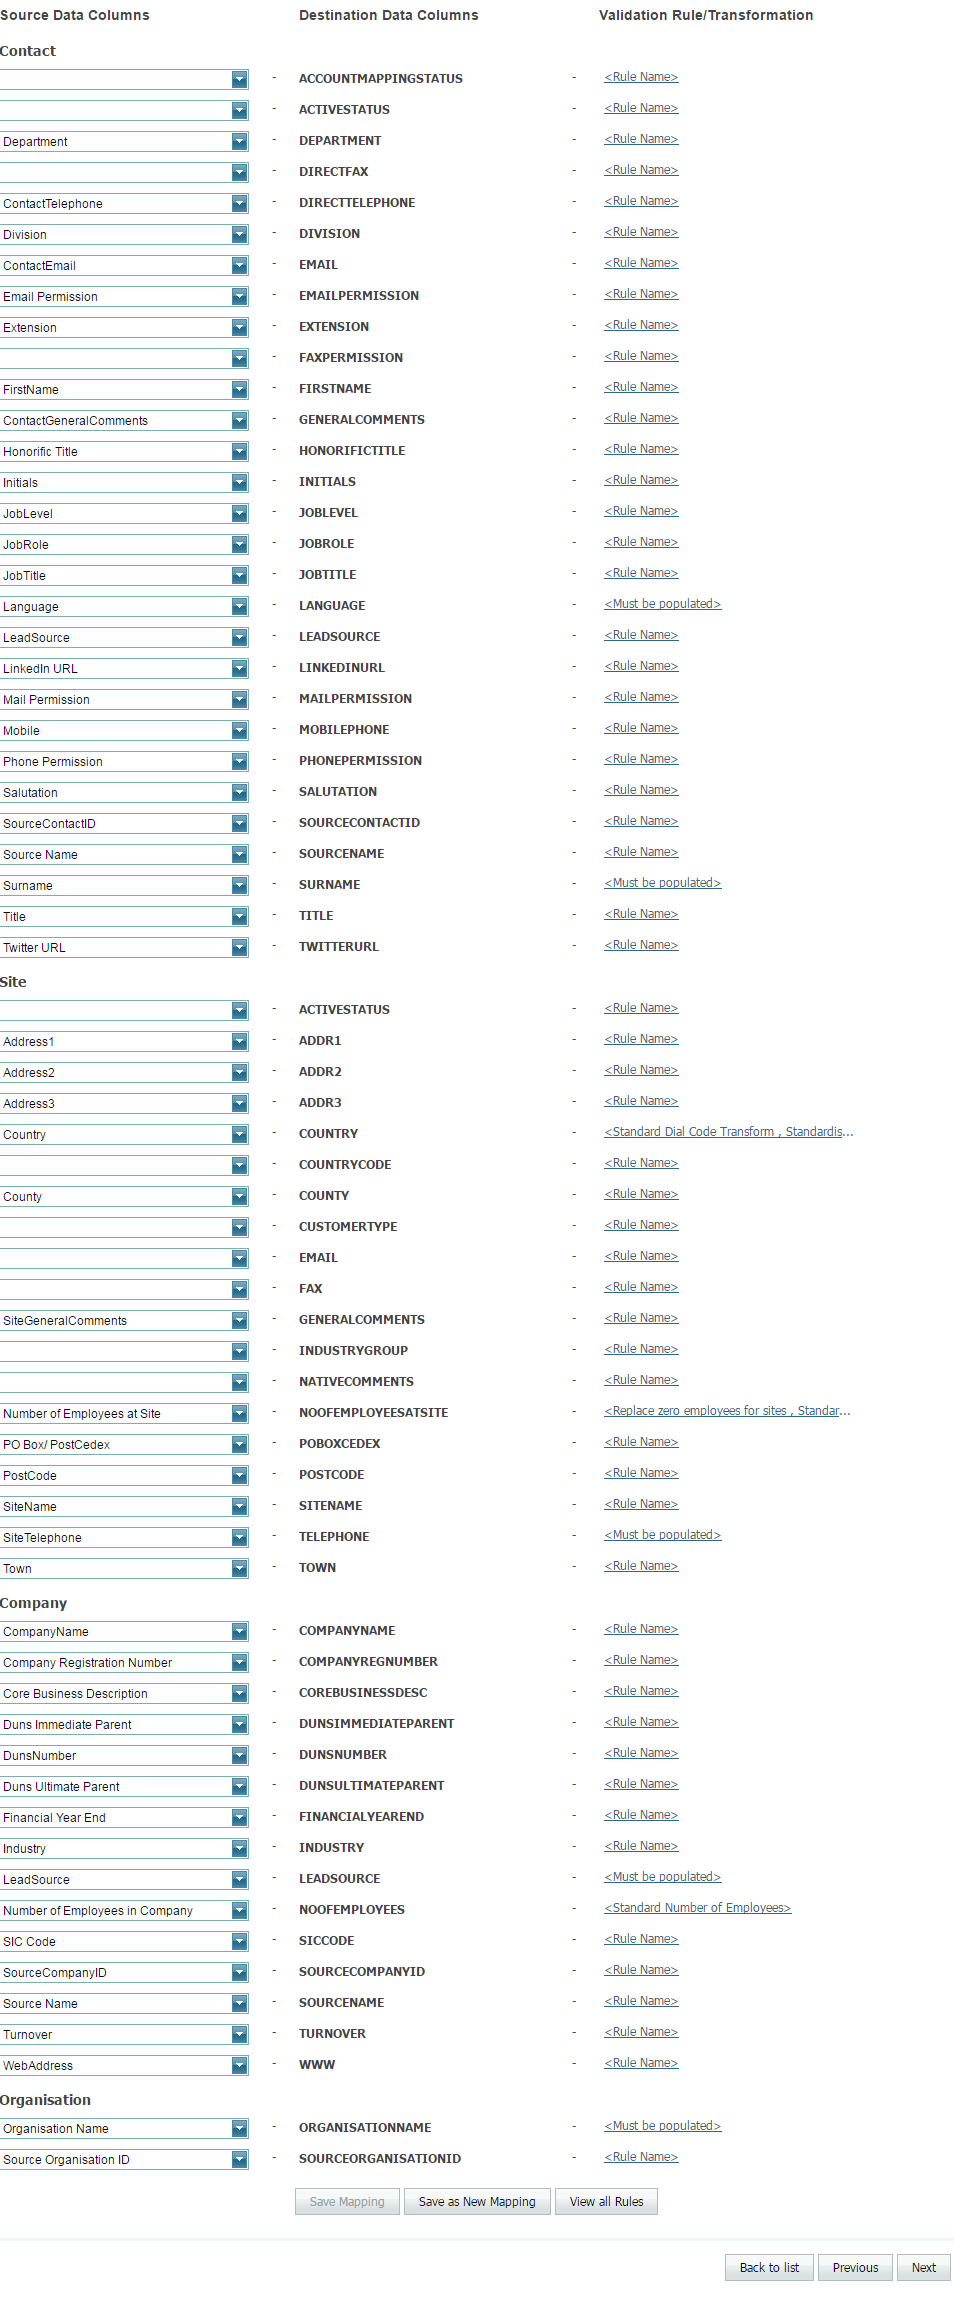
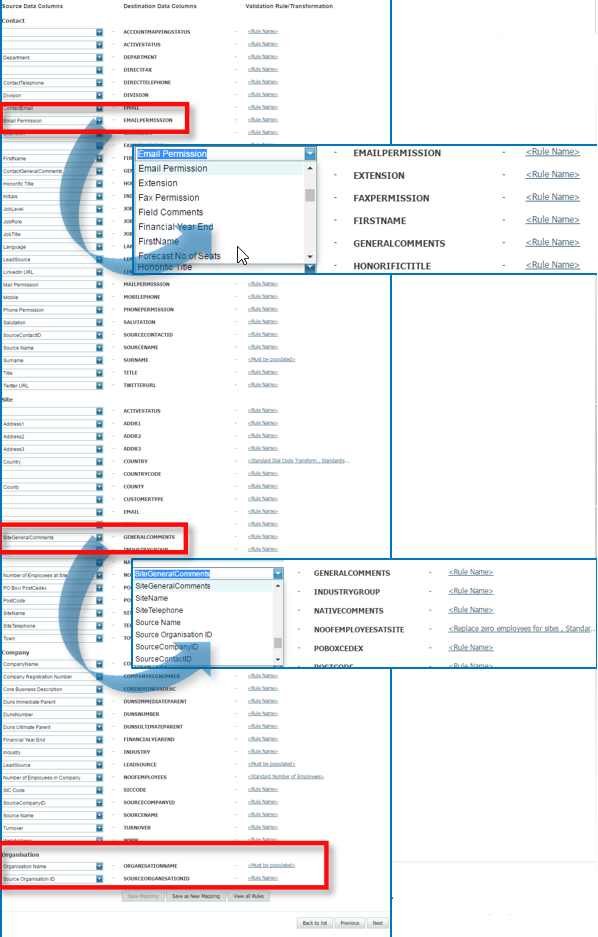
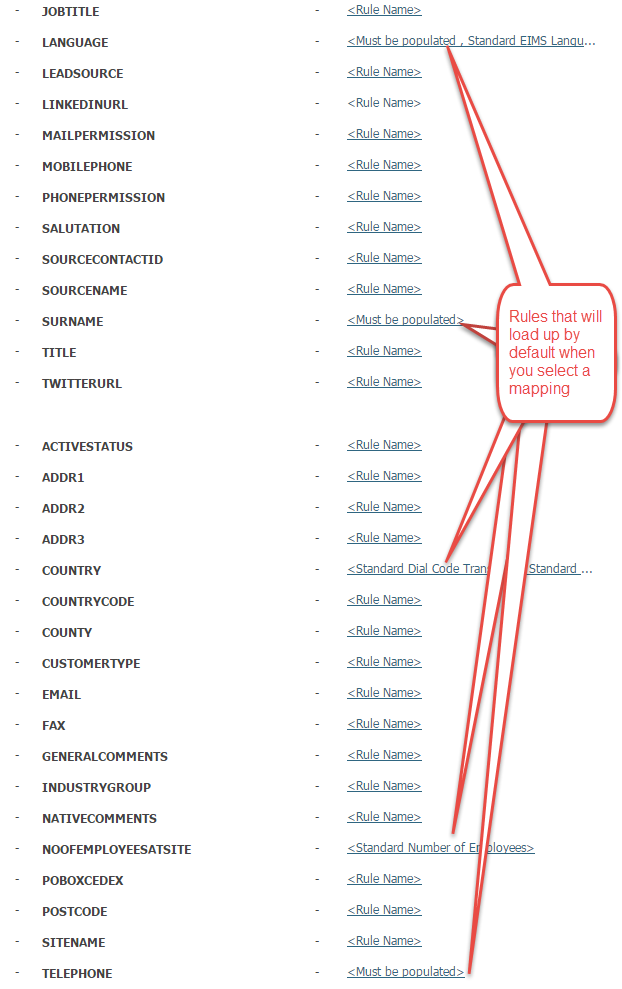
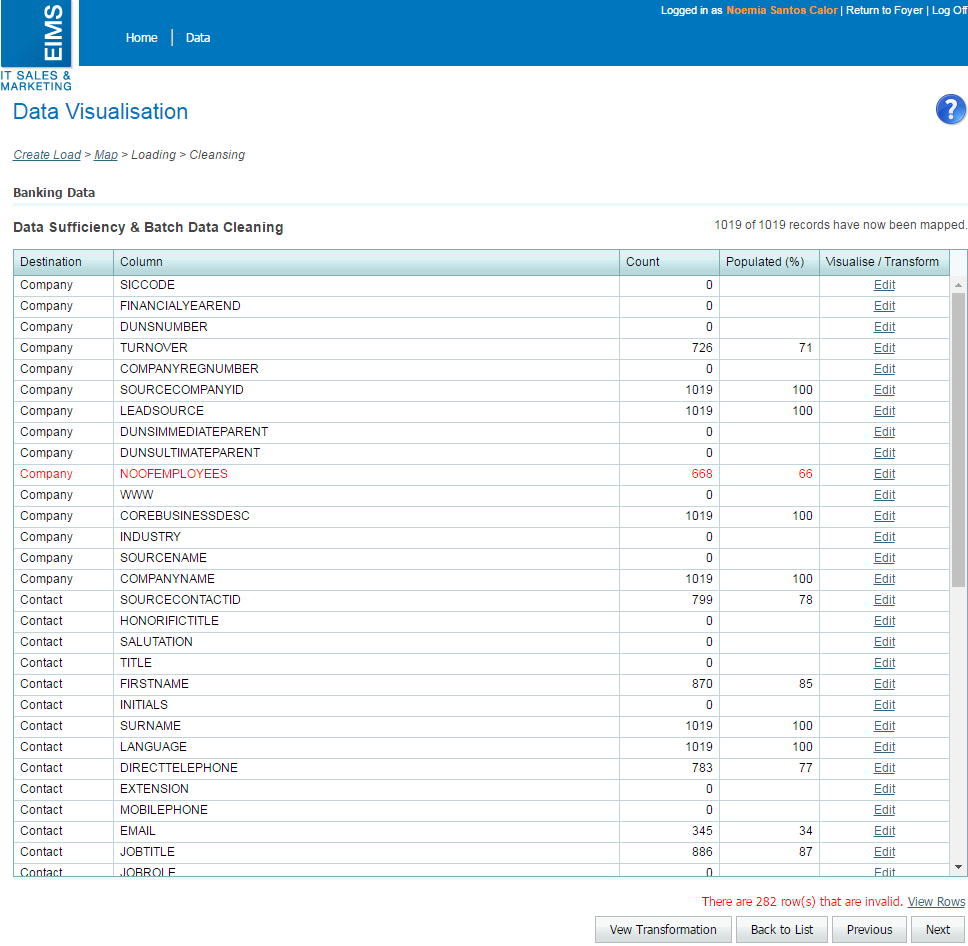
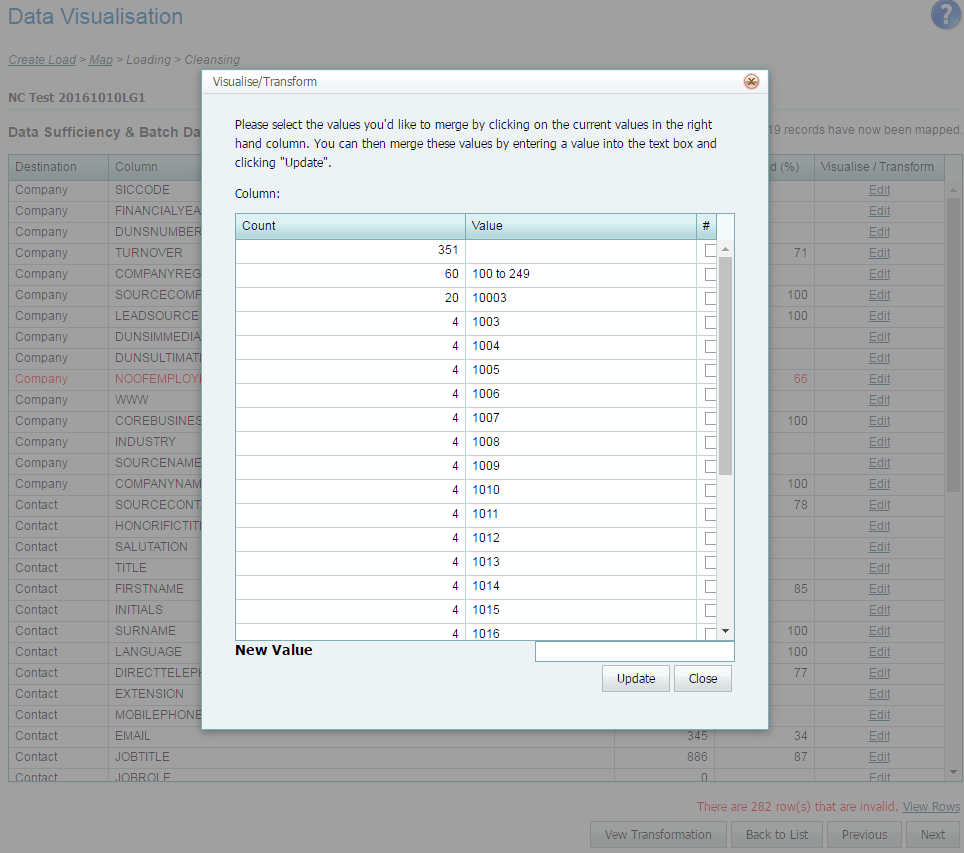
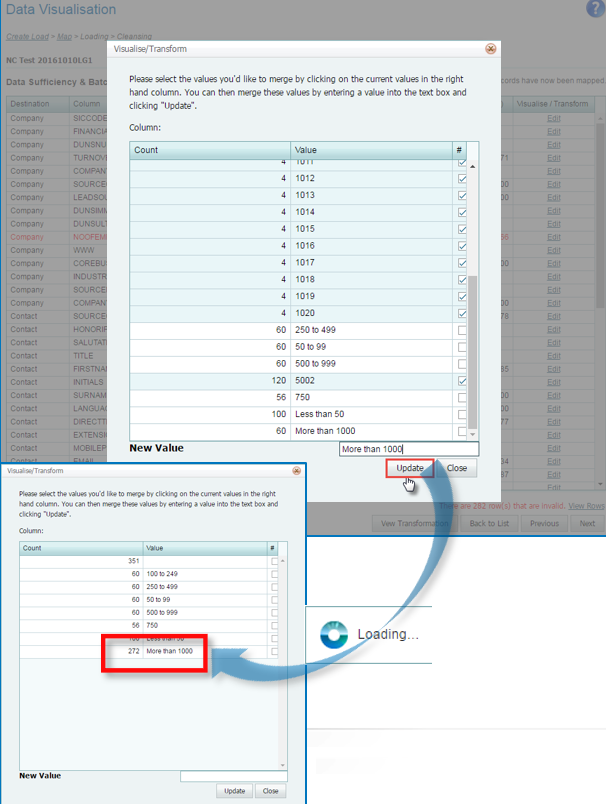
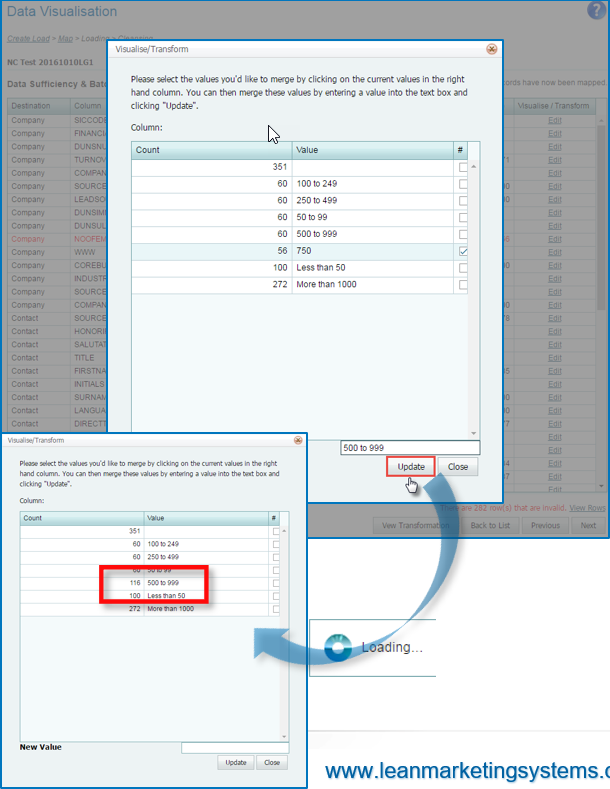
  • Config Detail [contains the configuration detail of your mapping]
    • Good to check if you mapped anything incorrectly….
  • Reports
    • Only the SQL to XLSX reports are available at the moment
      • Transformation Log & Import details

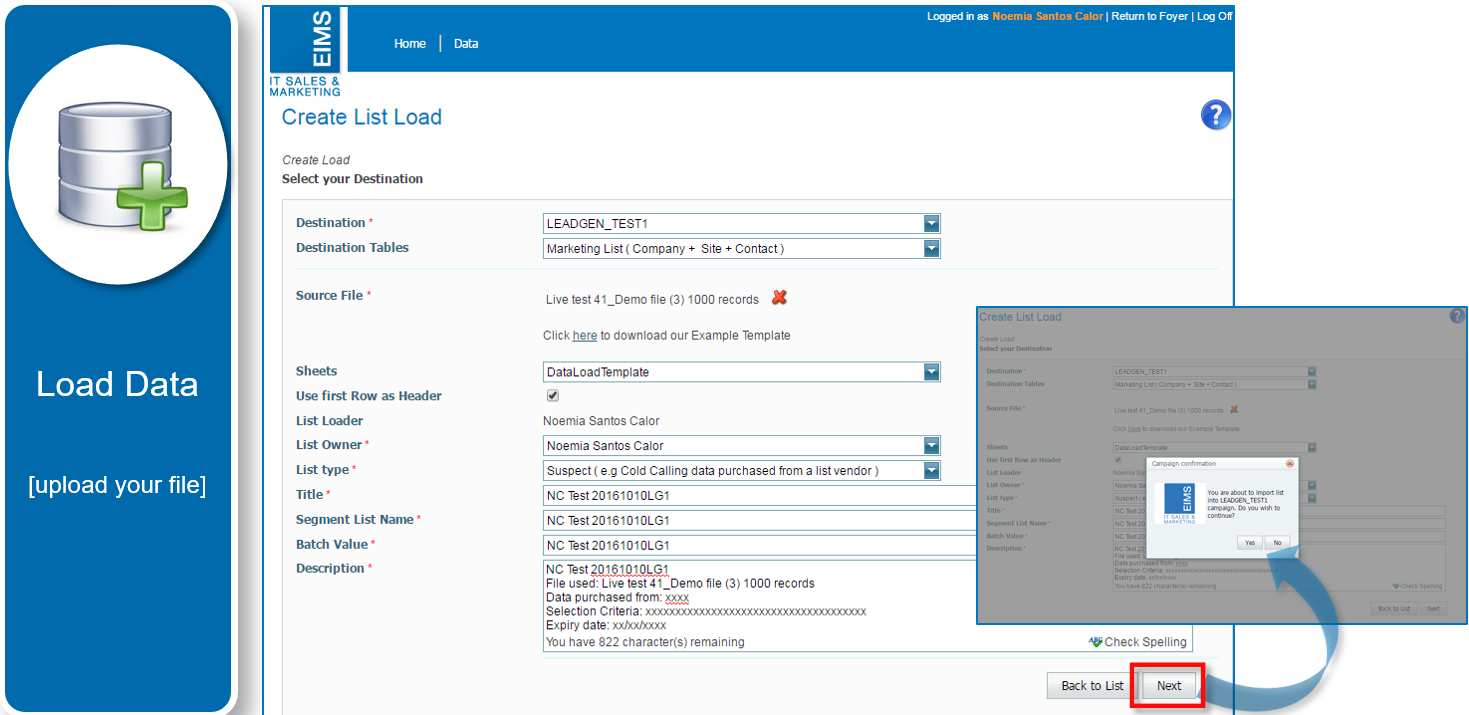
List Management: action icons in line with status of load

In List Management you will see the following action icons in the Action column (in line with the status of the load):

  • None – if the load has reached ‘Import Complete’ status
  • Edit action icon – if the load is in a status where it can no longer be deleted, but can be progressed to end. Applies to status ‘Target De-Duplication’, ‘Awaiting Final Changes-Dedupe’, ‘Awaiting Final Changes-Skip’, ‘Awaiting Final Changes-Manual’ & ‘Target Pumping in progress’. If you click on Edit the Activity Log pop up will load. Read more about it below.
  • Edit & Delete action icons - if the load is in a status where it can be edited and deleted. Applicable to these statuses: ‘Data Map Selection’, ‘Batch Data Cleansing’, ‘Source De-Duplication’, ‘Source Validation Complete’

Activity Log

When any data load is edited from the action column in List Management page, the Activity Log pop up will surface.

In this log you can see when and where actions have been started and completed for the list load. See an example below for a load which is at the 'Data Map Selection' stage:

If you edit a load which has List Status 'Import Complete' then you will find a complete log from start to end of the load, itemising all of the actions taken during the loading process for the data file. See an example below:

Listloader Checklist

help_outline
close