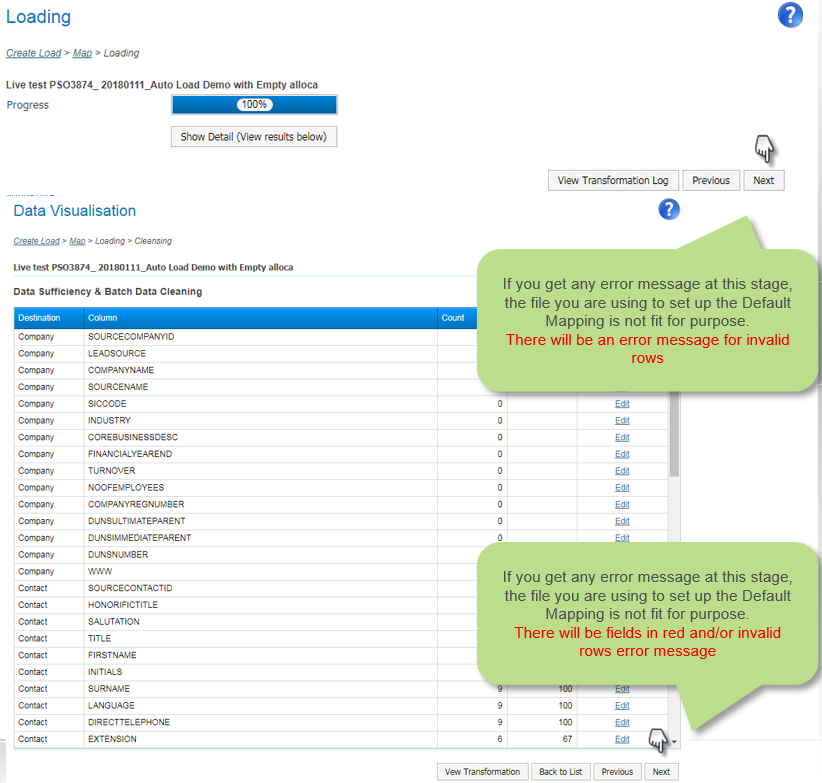
menu

WebPlatform Documentation

Auto Load for Leads

download

Auto Load for Leads

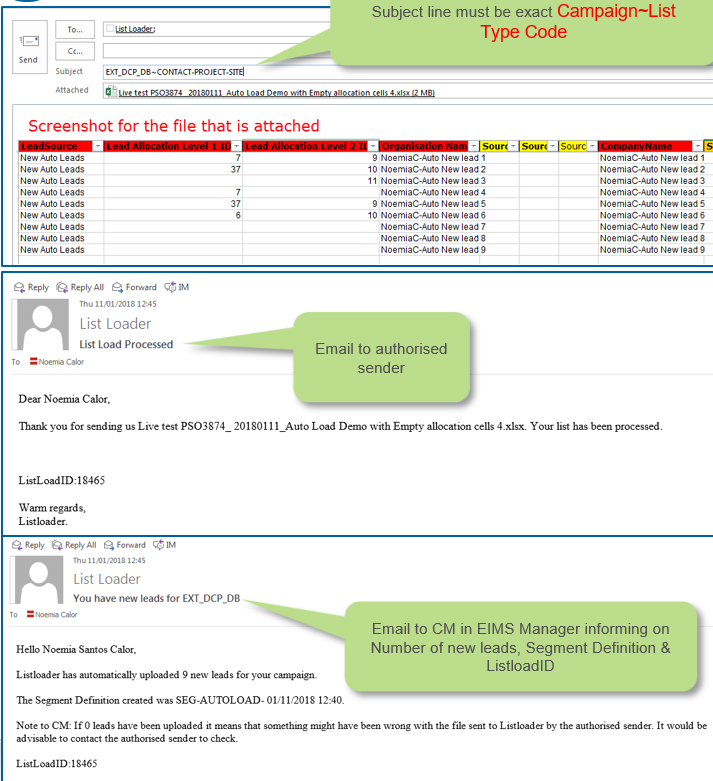
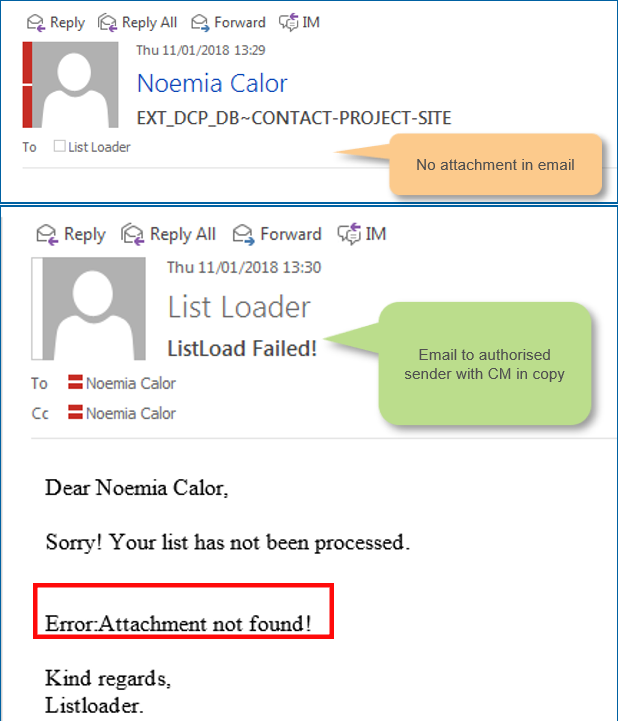
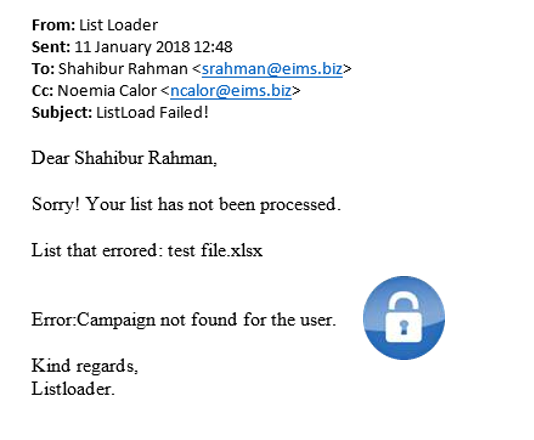
  • Listloader can be set up to allow leads to be emailed and automatically loaded.
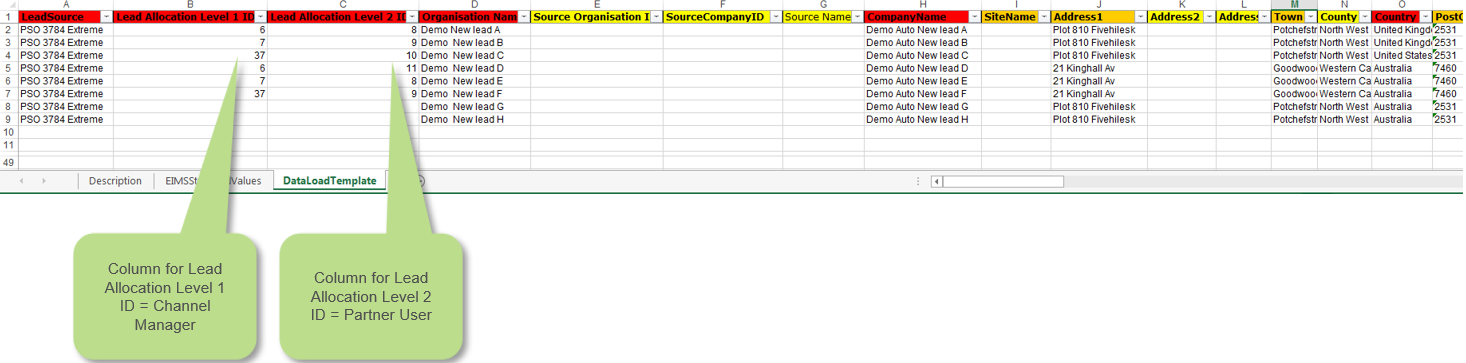
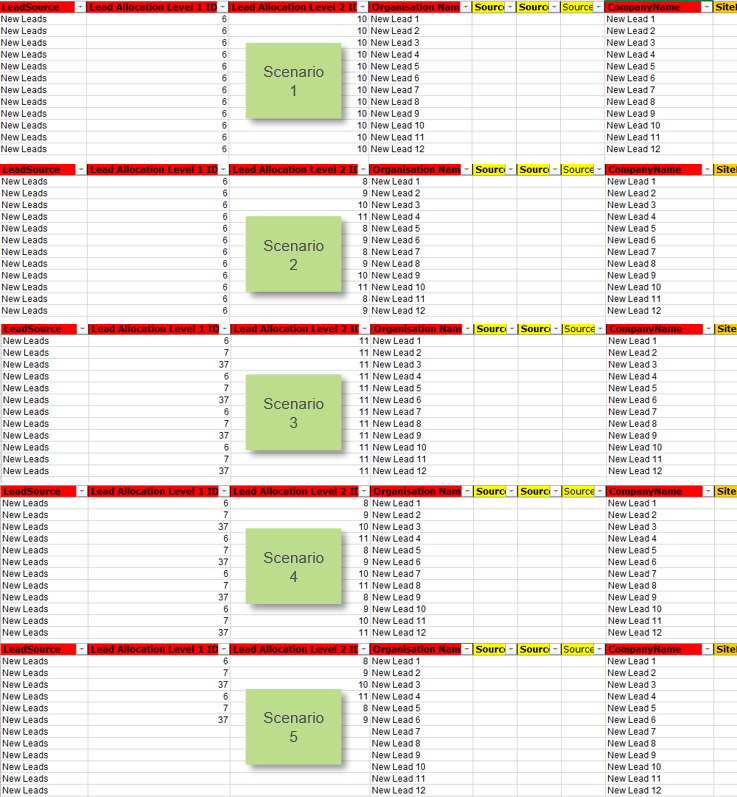
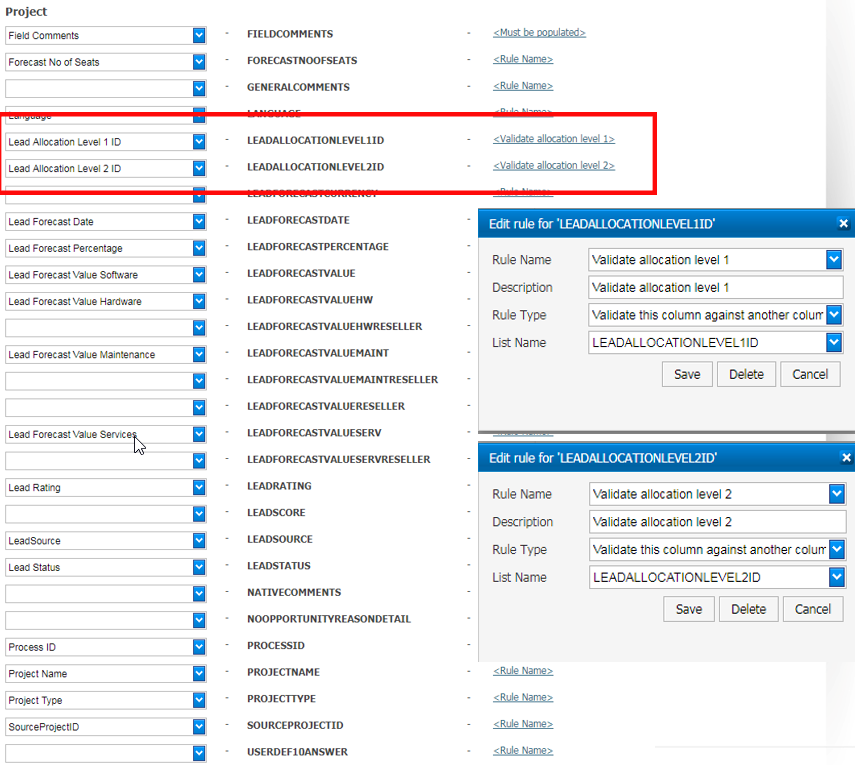
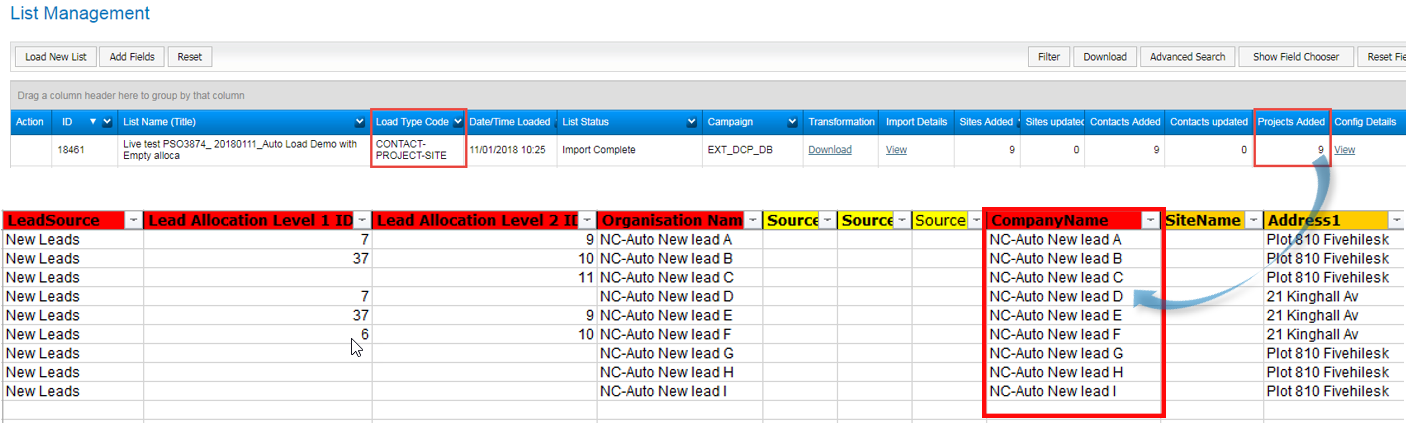
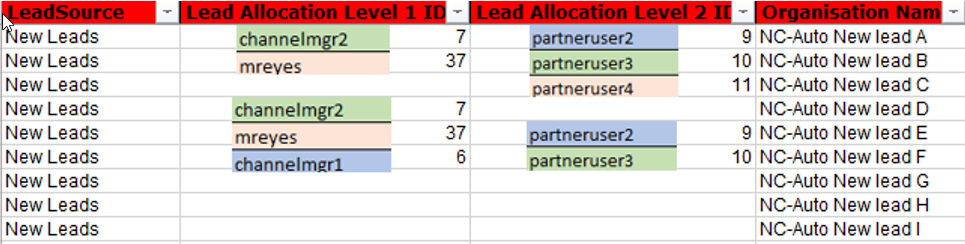
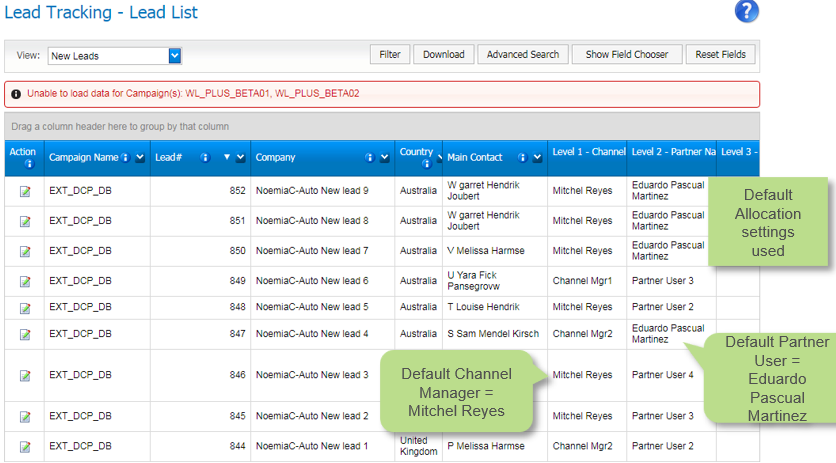
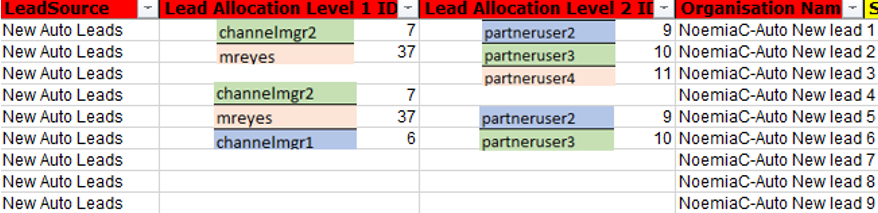
  • The data files include the lead allocation for levels 1 and 2 (Channel Manager and Partner User) as additional columns so that leads are loaded with the correct Channel Manager and Partner User.
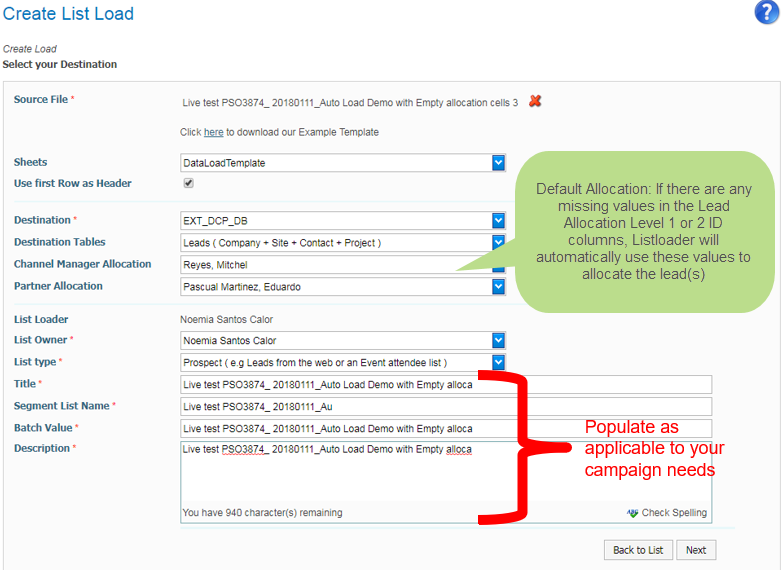
  • Leads are automatically allocated as they are loaded.

What we need for auto lead upload set up

Step by step guide to set up your Default Mapping for auto lead upload

So, lets see how we can auto load leads…Preparation

Step 1: Use the correct template (save a version of it for your leads)

Spreadsheet must include new columns for:

  • Lead Allocation Level 1 ID = Channel Manager ID
  • Lead Allocation Level 2 ID = Partner User ID
  • Process ID (Most useful if leads are linked to channel marketing activities for end-to-end reporting. You will find this column at the end of the template)
  • Salesforce Contact ID for the record (used for data sync and reporting)
  • Salesforce Accout ID for the record (used for data sync and reporting)
  • Salesforce Lead ID for the record (used for data sync and reporting)
  • Salesforce Opportunity ID for the record (used for data sync and reporting)

Step 2: Run the ID report for your campaign

It will be set up for all campaigns with Lead TrackingLite set up: Lead Allocation for Channel Managers and Partners in <<Client>> Campaign(s)

These ID’s will allow you to populate these columns:

  • Lead Allocation Level 1 ID (Channel Manager ID)
  • Lead Allocation Level 2 ID (Partner User ID)

Send the relevant ID’s to the vendor(s) authorised sender

  • So that the leads files they’ll send to Listloader contain the allocation ID’s for Channel Manager & Partner User
  • Supply Process ID if applicable

Step 3: Add the ID’s for CM & Partner allocation to your leads

In the new leads spreadsheet you can now add the ID’s for Channel Manager & Partner Allocation.

Some scenarios:

1. You can have all leads for the same Channel Manager & Partner User

2. You can have all leads for the same Channel Manager but different Partner Users

3. You can have leads for multiple Channel Managers and one Partner User

4. You can have leads for multiple Channel Managers and multiple Partner Users

5. You can have blank cells in the Lead Allocation Level 1 & 2 ID columns

Step 4: Default Mapping set up in Listloader

This default mapping will be used by the system to process all automated lead uploads (all files sent via email for the campaign)

  • Upload the file with leads
  • Select your Destination = Campaign & the correct Sheet
  • Select Destination Table = Leads ( Company + Site + Contact + Project )
  • Select default allocation (Channel Manager & Partner User)
    • This will be used by the system to populate any blanks for Lead Allocation Levels 1 & 2
  • Select List Type = Prospect (e.g Leads from the web or an Event attendee list)
  • Add Title / Segment List Name / Batch Value & Description as appropriate

In mapping stage add validations for Lead Allocation Levels 1 & 2

  • This is the most important stage. Make sure you get it right first time!
    • Invest time to get the best results for your lead uploads here
  • Add all the validations/rules you need to ensure every lead is uploaded correctly & can be reported upon correctly
    • e.g. unmapped fields cannot be used to pull data in reports
  • For Lead allocation fields the Rule type = Validate this column against another column (lookup list)
    • This means that only ID’s from your Channel Manager (Level 1) & Partner User (Level 2) Extracts will be accepted by Listloader
  • If an invalid ID is sent to Listloader a Fail Notification will be sent to the authorised sender and CM for the campaign in EIMS Manager

You should not have to take any action for these stages: Loading & Data Visualisation

  • Just click Next
  • Note: If you get any errors in these stages then your file is not appropriate for setting up the Default Mapping

Remember that in auto uploads there is no human intervention!

  • Skip Source Deduplication
    • You want to load all the leads in the file for your campaign every time
    • Click Next
  • Skip Target Deduplication
    • You want to lead all leads to be uploaded for your campaign every time
  • Click Set Mapping as Default to save it
    • Click OK in the confirmation pop up
  • Then Click Next to move to the final stage: Data Import

Step 5: Confirm your load detail in List Management

In List Management page check all projects have been created (numbers match the file)

Step 6: See your leads in LeadTracking

Check LeadTracking for your new leads

Make sure all are visible

Check allocations are correct

Compare the lead allocation with the uploaded leads in your spreadsheet

How to send leads for auto upload

Step 7: Send the file to listloader@eims.biz

In order for the system to process every file correctly you will need to have: 

  • Subject line following naming convention: Campaign~List Type Code
    • e.g. EXT_DCP_DB~CONTACT-PROJECT-SITE
  • Attach the file of leads you want to upload

You’ll receive a confirmation email once the file has been processed by Listloader

  • Success example
  • Details for Number of new leads, Segment definition & Listload ID are included

Troubleshooting: If 0 leads are uploaded it can also be an issue with the default mapping. Request file from authorised sender to check

Step 8: Check leads are visible in LeadTracking

Check LeadTracking for your new leads

  • Make sure all are visible
  • Check allocations are correct
    • Compare the lead allocation with the uploaded leads in your spreadsheet

Failures that can happen in auto upload

Error Scenario: Where the load fails…No attachment

  • If no attachment is in the email sent to Listloader
  • Listloader will send a ListLoad Failed! Notification to the authorised sender (also copy the CM in EIMS Manager) informing of Error: Attachment not found!

Error Scenario: Where the load fails…Validation failure

  • The file sent has incorrect allocation ID’s
    • Bogus numbers in Lead Allocation Level 1 ID & level 2 ID columns
    • See image below:
  • Listloader will send a ListLoad Failed! Notification to the authorised sender (also copy the CM in EIMS Manager) informing of Error: Error running rules.
    • Details for failed validations & Listload ID are included

Error Scenario: If an unauthorised sender sends a file to listloader…

  • If a user, other than an authorised user, sends a file to listloader for your campaign, Listloader will send this user a ListLoad Failed! notification……
  • Listloader will also copy the CM in EIMS Manager so that he/she is aware of this attempt
    • Error: Campaign not found for the user.
help_outline
close