Setup Multi Factor Authentication for your EIMS account
To login to the new Windows Virtual Desktop you are required to setup Multi-Factor Authentication against your user account. This steps below will assist you with setting up the additional authentication methods on your mobile phone. If you completed the UAT testing on the new EIMS Desktop, you already have MFA setup, click here to log into the desktop.
You will first need to login to your O365 account via a web browser. Please do this by clicking the following link – https://aka.ms/mfasetup
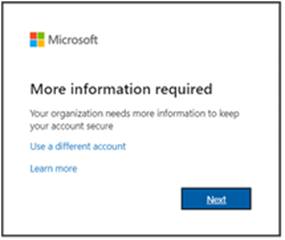
After you login, you will be informed that more information is required – the additional authentication from your mobile phone. Click Next to start the setup wizard.

From here, you’ll need to choose your preferred second method of authentication.
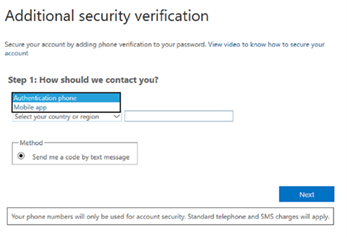
You can choose either of the two methods to authenticate. The ‘Authentication phone’ method will send a text to your phone, the ‘Mobile app’ method sends a notification to an app installed on your phone.
The Mobile App is convenient and secure – to authenticate, you simply need to acknowledge the notification. If you don’t want to install an app on your phone to manage this process, then the Authentication phone option (which sends an SMS to your phone) is an alternative.
Option 1 Authentication App (Recommended)
Our recommended method of authenticating is to use the Mobile app, for both security and ease of use. If you’d prefer not to install an application on your mobile phone, please go to Option 2 where you can use the ‘Authentication phone’ method to receive a six-digit code each time you need to authenticate.
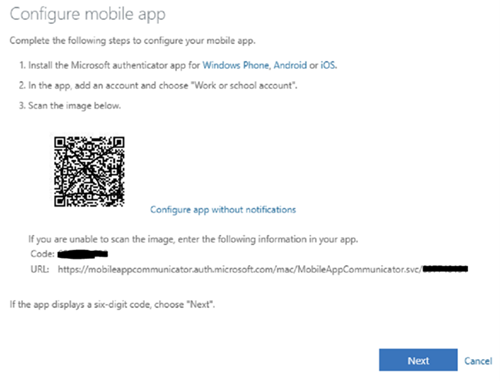
In the Additional security verification wizard, select Mobile app from the drop-down options, then click Next.
A QR code will be displayed that can needs to be scanned from the mobile app.
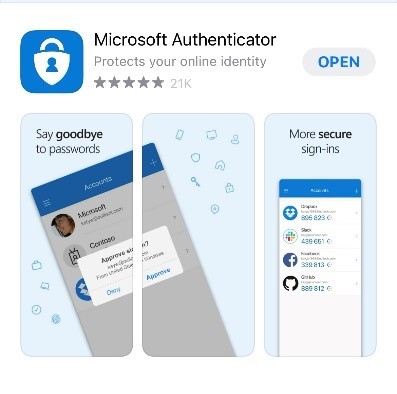
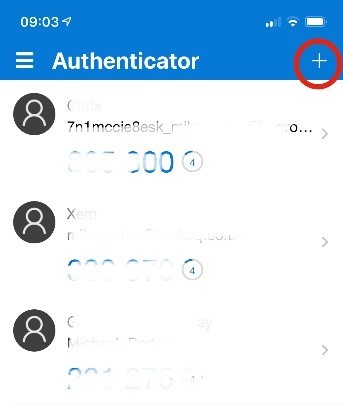
You can download the app this from your store (e.g. Google Play App Store for Android or the App Store for Apple devices) by searching for the Microsoft Authenticator app, which should look something like the below
Install the app and open it, then click on the plus (+) icon in the top right
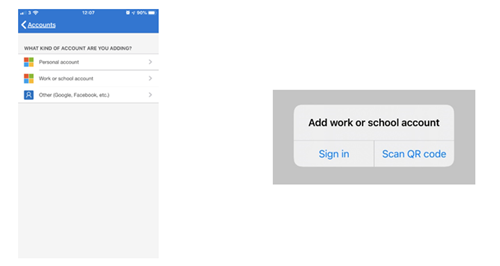
Select ‘Work or School Account’ then scan the QR code on your laptop. The app may request access to your camera which should be permitted
Once Scanned, click next and the system will test the connection by sending an approval request to your phone.
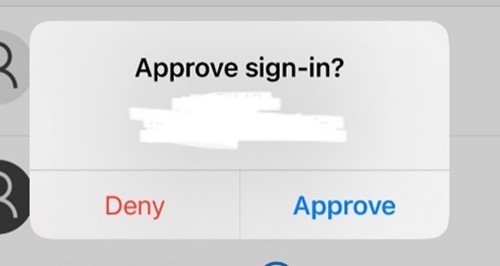
Click ‘Approve’ - the authentication profile is now setup on your mobile app and is ready to use.
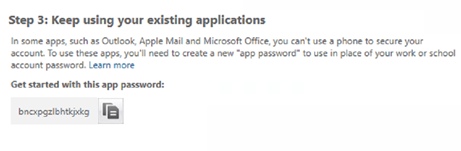
If you’re prompted to setup an additional app password, accept the automatically generated password and click Next / Finish to close the wizard.
This app password will only be used if you require to use a different version of the O365 applications that is not supported by standard methods. This auto-generated password can be reset as per your need.
Option 2 Authentication Phone
If you’d prefer not to install an application on your mobile phone, you can use the ‘Authentication phone’ method to receive a six-digit code each time you need to authenticate.
From the ‘Additional security verification’ wizard, select Authentication phone from the drop-down options.
Select your country code (e.g. United Kingdom +44) and enter your mobile number then click Next.
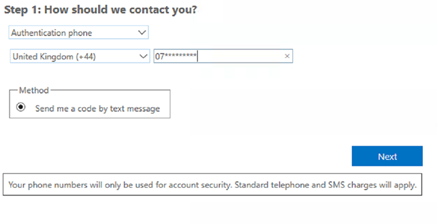
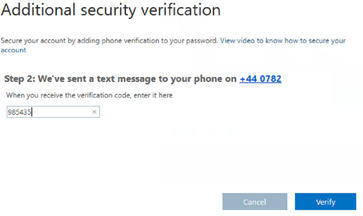
The system will test the connection by sending a text message request to your mobile phone. Once you receive this, input the unique 6-digit code into the wizard and click verify.
If you’re prompted to setup an additional app password, accept the automatically generated password and click Next / Finish to close the wizard.
This app password will only be used if you require to use a different version of the O365 applications that is not supported by standard methods. This auto-generated password can be reset as per your need.
I've setup MFA successfully, how do I login to the new desktop?
Now that you have setup MFA on your EIMS Account, you are ready to login to the new EIMS Desktop.
If you are using a Windows Device, click here
If you are using an Apple Mac or a Chromebook Device, click here