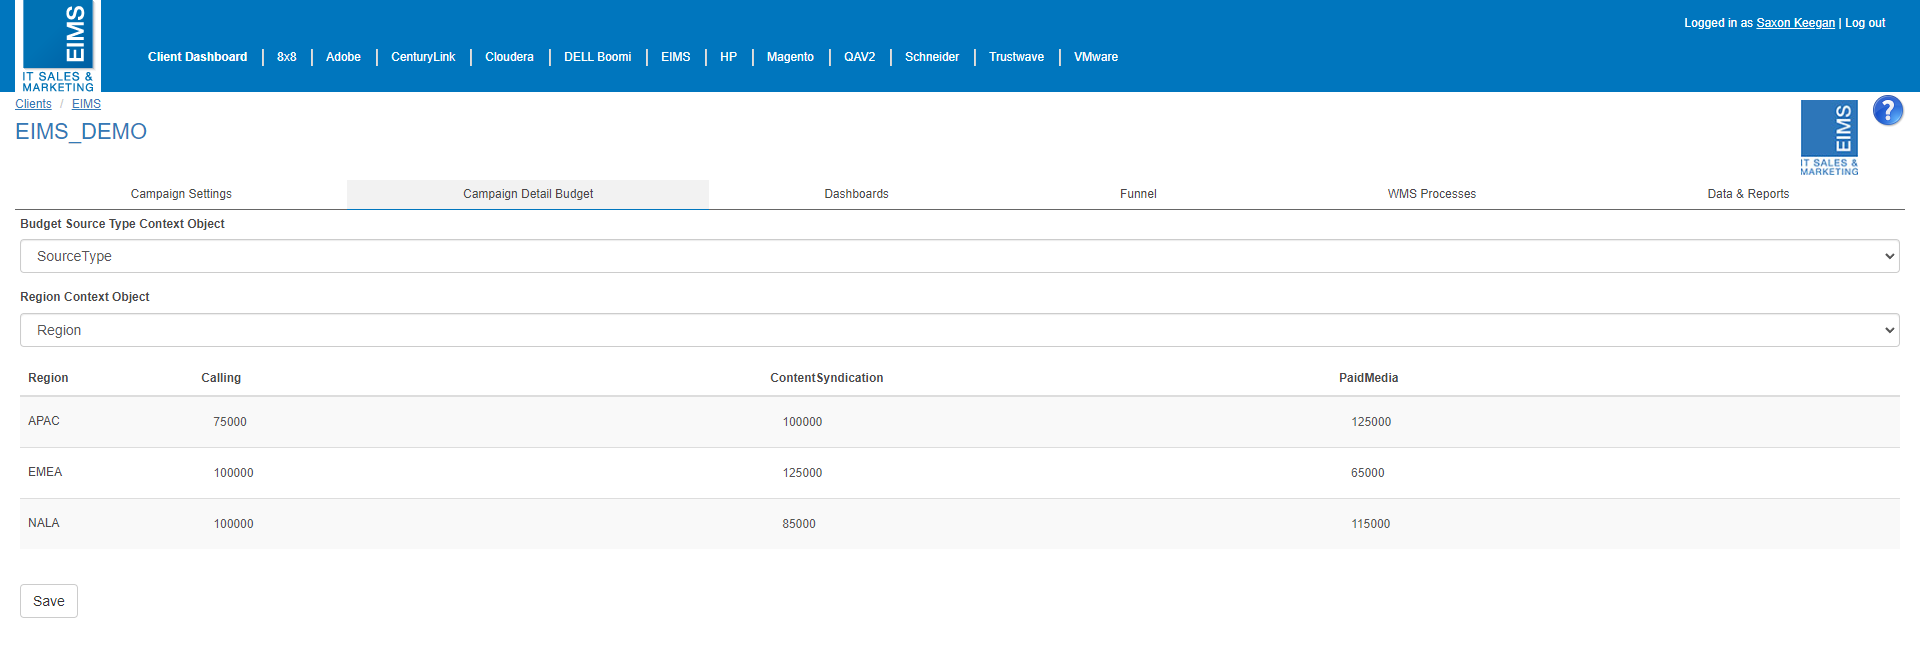
Campaign Detail Budget
NOTE: The Campaign Detail Budget tab will not be visible until an Inquiry Process has been connected to the campaign
The Inquiry process can handle Inquiries from different source types and regions. Campaigns that run across multiple regions and execute multiple source types (Paid Media, Content Syndocation and calling) will typically have a dedicated budget for each region and the source types within those regions. The campaign Detail budget defines the amount of budget allocated to each source type and region, this allows for greater granularity when filtering the Campaign Funnel Report.
Before the Campaign Detail Budget can be configured, an Inquiry Process must be connected to the campaign and the "Enable Detail Budget" checkbox has been checked. The Inquiry Process must be set because the source type and region values are defined by field values from the Inquiry Process.
Budget Source Type Context Object
The Budget Source Type field defines the source types for the campaign. The dropdown contains a list of all the fields in the connected Inquiry process that have a Fix List field type, this means that the source field must be of a list type in order to use the budget breakdown.
Select the field called "SourceType" from the dropdown. This field name should not change as it is critical when determining how an Inquiry is routed down the funnel.
Region Context Object
The Region field defines the regions for the campaign. Simiularly to the budget field, The dropdown contains a list of all the fields in the connected Inquiry process that have a Fix List field type, this means that the region field must be of a list type in order to use the budget breakdown.
Select the field called "Region" from the dropdown. This field name should not change as it is one of the fields used throughout the Power BI reports structure and filter the reports.
Budget Breakdown
Once the source type and region fields have been configured, a grid will display with the Source types as columns and the regions as rows. Each cell in the grid can be populated with a number that represents the amount of budget for the source type within the region.
CPL campaigns only fall under the ContentSyndication column so the budget should only be set in the Content Syndication column. When additional campaigns dashboards are created, the budget should be added to the existing amount.