menu

WebPlatform Documentation

CPL Campaign Dashboards with Validation

download

Why have we created dashboards for CPL Campaigns?

The purpose of a CPL campaign dashboard is that it helps users who are involved in the content syndication campaign access all information such as the CBD, Signed SOW Document, Live Reports and any training content from a centralised location. It also allows new users coming into the campaign to quickly and easily access content for the campaign.

Summary

A CPL Campaign Dashboard is a centralised location for all the resources in a given campaign. The dashboard is split into 8 tiles:

  • Campaign Setup Process
  • Official Briefing Document
  • Deal SOP Process
  • QBR Process
  • Live Inquiries
  • Inquiry Details
  • Live Reports
  • Other Resources

Using the dashboard

Campaign Setup Process

This tile displays the New Campaign Setup Process Diagram for the campaign, the importance of this tile on the dashboard is that it allows you visualise and understand the status of where the Campaign Setup currently is for the campaign

Official Briefing Document

This tile displays the Campaign Briefing Document and the SOW Document. The CBD is viewed via a SharePoint Link to the document. Clicking on the SOW button will download the relevant document for the campaign.

It is important to have these two documents in the dashboard as it provides a 'single source of truth' for the CBD and Signed SOW for a campaign.

Deal SOP Process

This tile displays the Deal SOP Process Diagram for the campaign, the importance of this tile on the dashboard is that it allows you visualise and understand the status of the Deal SOP for the campaign.

QBR Process

This tile displays the QBR Process Diagram for the campaign, the importance of this tile on the dashboard is that it allows you visualise and understand the status of the Quartely Review for the campaign.

Live Inquiries

This tile displays the overview for the WBL campaign process. You can track in real time the progression of Inquiries through the process. You can interact with the overview by opening the overview in a new tab and clicking a WorkItem to see the processes currently active.

Inquiry Details

This tile shows an aggregate of processes active and completed for each WorkItem in the Live Inquiries process. 

Clicking the expand button in the top right corner displays a list of all inquiries for the campaign with links to the workitem and process.

Live Reports

This tile displays the Campaign funnel reports which is used for the client. This is a central report by client into which all CPL campaigns data is uploaded.

There are additional buttons in this tile for:

  • Opening the report in the tile in a new tab
  • CPL Publisher report
  • Internal Publisher report
  • A link to the Campaign Process for the Client

The live reports tile is important to be displayed on the dashboard as it displays the campaign reports which are currently being used for the campaign.


Other Resources

This tile displays additional resources which are relevant to all CPL campaigns such as training content. There are four default pieces of content:

  • In house Validation & Verification
  • Digital Enablement
  • Issue Handling
  • Dispute Resolution Form
  • Validation and Verification rules

There are a few additional placeholders for which you can supply content which is specific to the campaign/client.

There are also additional buttons in the Other Resources tile for:

  • The Publisher Import Template - which the publisher will use to import data into the process
  • The Rejects Import Template - which EIMS resource (Media Buyers) will use to import rejected inquiries into the process
  • Bulk Import/Update - the bulk import information for the client. Email addresses to send inquiries to the process (for publisher inquiries and also rejected inquiries). The JSON required for bulk update of both publisher inquiries and rejects are also available here
  • Leads Update Template - the template to use for bulk updating inquiries so that these are in line with their journey in the client system
  • Request Changes - the process to use in order to request changes to the dashboard e.g. data schedule time, increase budget, update campaign end date, addition of publishers for configuration settings.

The Other Resources tile is important to be displayed on the dashboard as it contains all the relevant information in a single place and anyone can easily familiarise themselves with this type of campaign.

Training content for CPL Campaign Dashboards

Training content for CPL Campaign Dashboards can be downloaded here

Complete End to End Setup

The complete end to end CPL campaign dashboard setup is required when creating the first dashboard for a client or when a CPL dashboard setup is in a different currency to the existing campaign(s). Below is the full list of required items that must be setup to complete the full end to end setup:

  1. WBL Campaign Process
  2. Bulk Import Template & Import Automation - Valid Inquiries
  3. Bulk Import Template & Import Automation - Rejected Inquiries
  4. Campaign Configuration
  5. Funnel Configuration
  6. Campaign Funnel Report
  7. Client Publisher Report
  8. CPL Dashboard

WBL Campaign Process Creation

TIP: Keep a note of the API Key and API URL for the new process as it will be added to the bulk import / update details later in the setup

A process called WBL_EIMS_DEMO exists in WMS designer and it is the standard process for all digital campaigns. Take a copy of the WBL_EIMS_DEMO process and name it using the following naming convention: WBL_{ClientName}_{Region} (Example: WBL_ADOBE_NA).

Before the process can be cut live the API key (see the minions documentation for API key creation) needs to be created and the process minions need updating.

There are 3 minions that need to be updated, this requires changing the API key to the newly generated key and updating the minion URL with the API URL for the current process. The minions to be updated are located on the following WorkItems:

  • 1.Client Approval (WorkItem)
  • Record Cleared (Timer)
  • 72 hours auto accept for Inquiries (Timer)

Bulk Import Template & Import Automation

TIP: See the Bulk Import Documentation on how to use bulk import and how to configure bulk import automation

Now that the process is setup and cut live we need to conduct 2 test bulk imports. The imports will be used as templates for the valid and rejected inquiry import automation emails. Before starting, download the Publisher Import Template & Reject Import Template and add some test data. You will need at least 1 row of test data in order to complete the bulk imports.

Valid Inquiries Setup

Below are the configuration details for the valid inquiries bulk import. Please ensure you use the exact configuration provided, if the bulk import is not configured as detailed below then you will run into issues when the Inquiries are delivered from the publisher.

Source De Duplication Settings

Target De Duplication Settings

Field Mapping

Below is the field mapping to use for the valid inquiries bulk import. The SourceFileColumn is the column from the Publisher Import Template, DestinationField is the field from the campaign process in WMS and the DefaultValue is a static value that is set when a SourceFileColumn is not mapped. If the SourceFileColumn is not mapped and the DefaultValue is NULL then the mapping should be ignored.

SourceFileColumn DestinationField DefaultValue
NULL Process Owner Account Manager for this campaign
NULL Process Requester Account Manager for this campaign
NULL Process Country United Kingdom
First Name FirstName NULL
Last Name LastName NULL
Business Email Email NULL
Telephone PhoneNumber NULL
Job Title JobTitle NULL
Company Name CompanyName NULL
Inquiry Status? InquiryStatus NULL
NULL Situation NULL
NULL Problem NULL
NULL Implication NULL
NULL Need NULL
NULL Authority NULL
NULL Timeframe NULL
NULL Budget NULL
NULL CloseDate NULL
NULL SfdcLeadId NULL
NULL SfdcOpportunityId NULL
Source Type SourceType NULL
NULL Markup NULL
Email Permission EmailPermission NULL
Phone Permission PhonePermission NULL
Mail Permission MailPermission NULL
NULL ReasonForDisqualification NULL
NULL LeadStatus NULL
NULL Stage NULL
NULL Value NULL
Industry Sector Industry NULL
NULL FollowUpComments NULL
Co Size by Employee CompanySize NULL
Address 1 Address1 NULL
Address 2 Address2 NULL
City / Town Town NULL
County / Region / State County NULL
Country Country NULL
Postcode / Zipcode PostCode NULL
Website URL Website NULL
Turnover Turnover NULL
NULL Publisher NULL
Medium Medium NULL
Asset Name 1 AssetTitle NULL
NULL SearchTerm NULL
Client Client NULL
Advertiser Advertiser NULL
NULL Segment NULL
Mobile Phone Number Mobile NULL
NULL Account NULL
Salutation Salutation NULL
Direct Dial Telephone DirectPhoneNumber NULL
LinkedIn URL LinkedInURL NULL
Address 3 Address3 NULL
Sub-Source Sub-Source NULL
Asset Name 1 AssetName1 NULL
Asset Name 2 AssetName2 NULL
Publisher ID PublisherID NULL
Opt-In (Explicit Consent) Opt-In(ExplicitConsent) NULL
Opt-In (Legitimate Interest) Opt-In(LegitimateInterest) NULL
Tactic Tactic NULL
Lead Origination Date LeadCreatedDate NULL
Agency Placement Name AgencyPlacementName NULL
Campaign ID CampaignID NULL
Date / Timestamp Timestamp NULL
Job Level JobLevel NULL
Business Function BusinessFunction NULL
NULL EmailVerification NULL
NULL PhoneVerification NULL
Channel Channel NULL
Interaction Type interactiontype NULL
Offer Code OfferCode NULL
Ov code ovcode NULL
SFDC Campaign Status sfdcCampaignStatus NULL
Response Type ResponseType NULL
Product of Interest ProductOfInterest NULL
Language Language NULL
Lead Source Detail LeadSourceDetail NULL
NULL LeadSourceClient NULL
Campaign Name CampaignName NULL
utm Campaign ID CampaignIDUTM NULL
utm Country CountryUTM NULL
AdGroup AdGroup NULL
Department Department NULL
NULL CBDURL NULL
EIMS API Required? API NULL
Data Validated? CSDataValidated NULL
Region Region NULL
Publisher Lead ID DigitalUniqueId NULL
NULL LdmPermissions NULL
Publisher Contact Email PublisherContactEmail NULL
Publisher Lead ID First Note NULL


Rejected Inquiries Setup

Below are the configuration details for the rejected inquiries bulk import. Please ensure you use the exact configuration provided, if the bulk import is not configured as detailed below then you will run into issues when the Inquiries are delivered from the publisher.

Source De Duplication Settings

Target De Duplication Settings

Field Mapping

Below is the field mapping to use for the rejected inquiries bulk import. The SourceFileColumn is the column from the Publisher Import Template, DestinationField is the field from the campaign process in WMS and the DefaultValue is a static value that is set when a SourceFileColumn is not mapped. If the SourceFileColumn is not mapped and the DefaultValue is NULL then the mapping should be ignored.

SourceFileColumn DestinationField DefaultValue
NULL Process Owner Account Manager for this campaign
NULL Process Requester Account Manager for this campaign
NULL Process Country United Kingdom
NULL FirstName N/A
NULL LastName N/A
NULL Email na@na.com
NULL PhoneNumber N/A
Job Title JobTitle NULL
Company Name CompanyName NULL
NULL InquiryStatus Declined
NULL Situation NULL
NULL Problem NULL
NULL Implication NULL
NULL Need NULL
NULL Authority NULL
NULL Timeframe NULL
NULL Budget NULL
NULL CloseDate NULL
NULL SfdcLeadId NULL
NULL SfdcOpportunityId NULL
NULL SourceType ContentSyndication
NULL Markup NULL
NULL EmailPermission Opt In
NULL PhonePermission Opt In
NULL MailPermission Opt In
NULL ReasonForDisqualification NULL
NULL LeadStatus NULL
NULL Stage NULL
NULL Value NULL
Industry Sector Industry NULL
NULL FollowUpComments NULL
NULL CompanySize 1-49
NULL Address1 N/A
Address 2 Address2 NULL
NULL Town N/A
NULL County N/A
Country Country NULL
NULL PostCode N/A
Website URL Website NULL
Turnover Turnover NULL
NULL Publisher NULL
Medium Medium NULL
Asset Name 1 AssetTitle NULL
NULL SearchTerm NULL
Client Client NULL
Advertiser Advertiser NULL
NULL Segment NULL
Mobile Phone Number Mobile NULL
NULL Account NULL
Salutation Salutation NULL
Direct Dial Telephone DirectPhoneNumber NULL
LinkedIn URL LinkedInURL NULL
Address 3 Address3 NULL
Sub-Source Sub-Source NULL
Asset Name 1 AssetName1 NULL
Asset Name 2 AssetName2 NULL
Publisher ID PublisherID NULL
NULL Opt-In(ExplicitConsent) YES
NULL Opt-In(LegitimateInterest) YES
Tactic Tactic NULL
Lead Origination Date LeadCreatedDate NULL
Agency Placement Name AgencyPlacementName NULL
Campaign ID CampaignID NULL
Date / Timestamp Timestamp NULL
NULL JobLevel Non-Influencers
NULL BusinessFunction Business Owner / General Office
Email Verification EmailVerification NULL
Phone Verification PhoneVerification NULL
Channel Channel NULL
Interaction Type interactiontype NULL
Offer Code OfferCode NULL
Ov code ovcode NULL
SFDC Campaign Status sfdcCampaignStatus NULL
Response Type ResponseType NULL
Product of Interest ProductOfInterest NULL
Language Language NULL
Lead Source Detail LeadSourceDetail NULL
NULL LeadSourceClient NULL
Campaign Name CampaignName NULL
NULL CampaignIDUTM NULL
NULL CountryUTM NULL
AdGroup AdGroup NULL
Department Department NULL
NULL CBDURL NULL
NULL API No
NULL CSDataValidated No
Region Region NULL
Publisher Lead ID DigitalUniqueId NULL
NULL LdmPermissions NULL
Publisher Contact Email PublisherContactEmail NULL
Publisher Lead ID First Note NULL

Campaign Configuration

NOTE: This part of the setup requires a user with admin rights within the Campaign Dashboards module

In order to create the campaign funnel and publisher reports a campaign must be configured within the Campaign Dashboards module. The campaign configuration is used to generate the data tables that the Power BI reports are build on. 

Create Client

If the campaign is for a new client or this is the first campaign dashboard for the client then you will need to create the client first. This is done by clicking the New Client button on the client list page:

Create Campaign

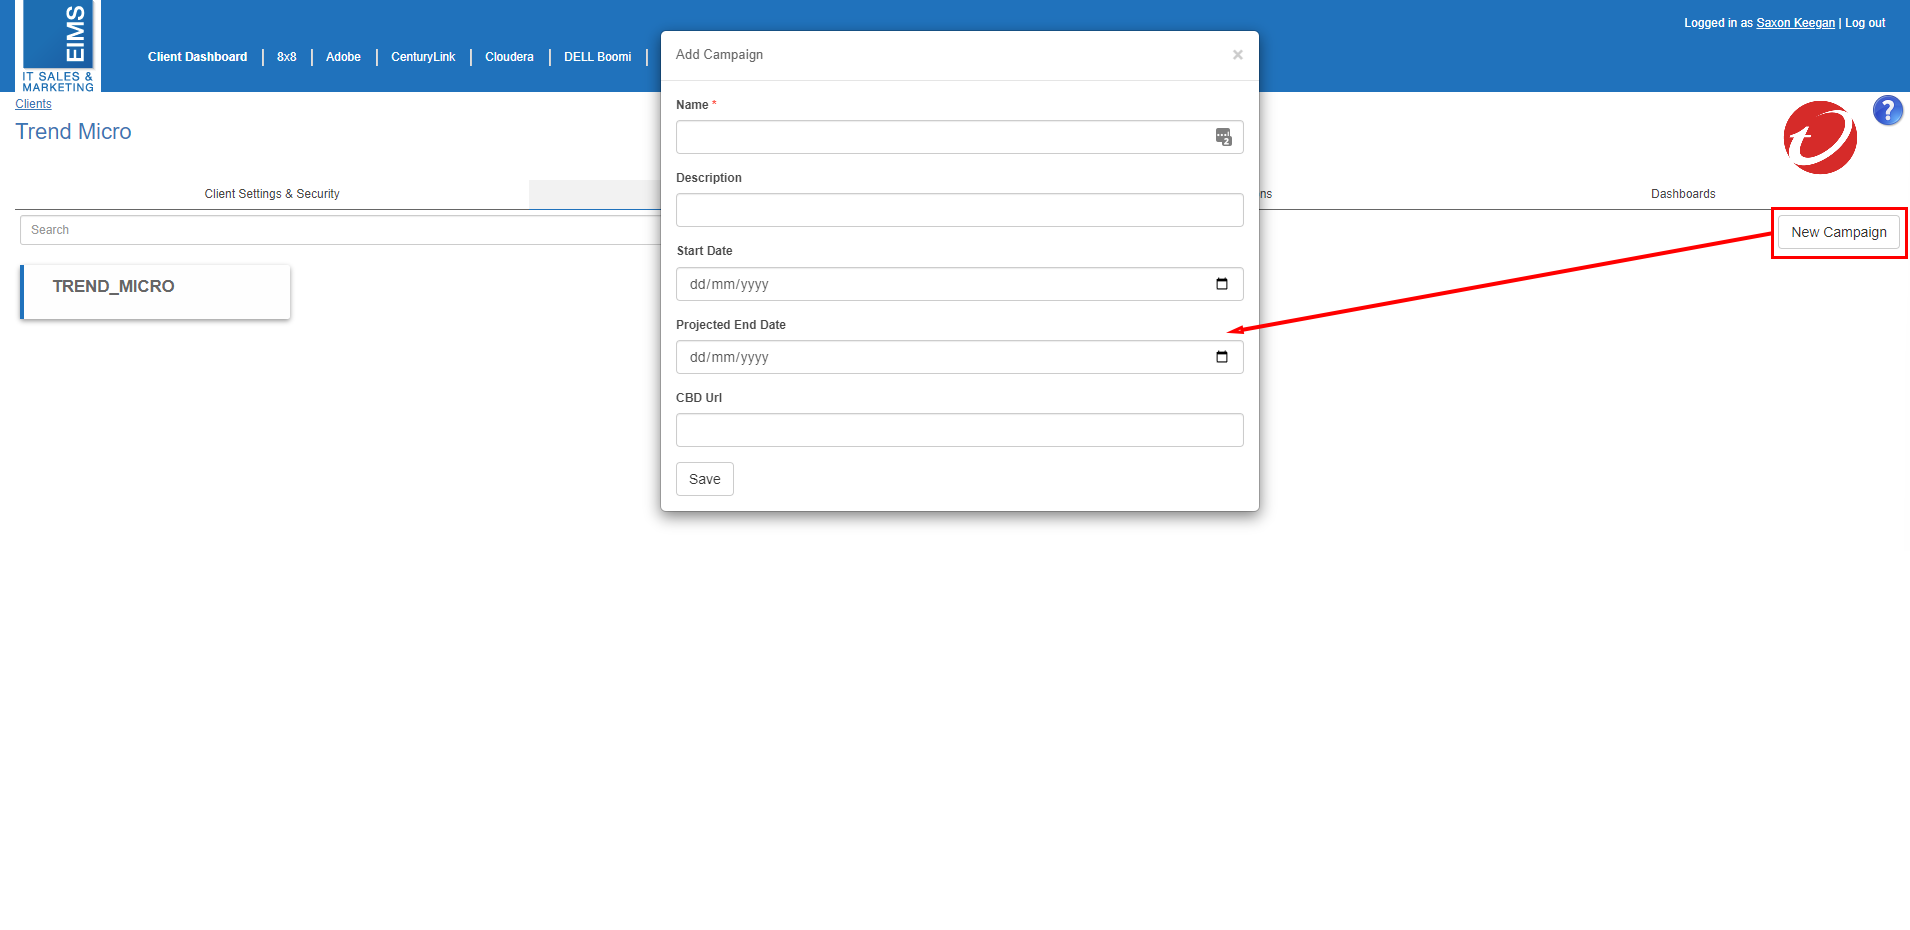
Once the client exists in the module select the client and navigate to the Campaigns tab. Click the New Campaign button and enter a name in the following convention (must be all in uppercase): {CLIENTNAME}_{REGION}.

The only other fields that are required to be populated for a CPL Campaign are the Start Date and Projected End Date.

Set Campaign Process

Once the campaign is created we must assign the campaign process to the campaign. Click the Set Inquiry Process button, uncheck the Copy Process box and select the campaign that was setup earlier in the guide from the dropdown. Click the Create Process button and the process will be set against the campaign, click the Save button.

Configure Campaign Budget Breakdown

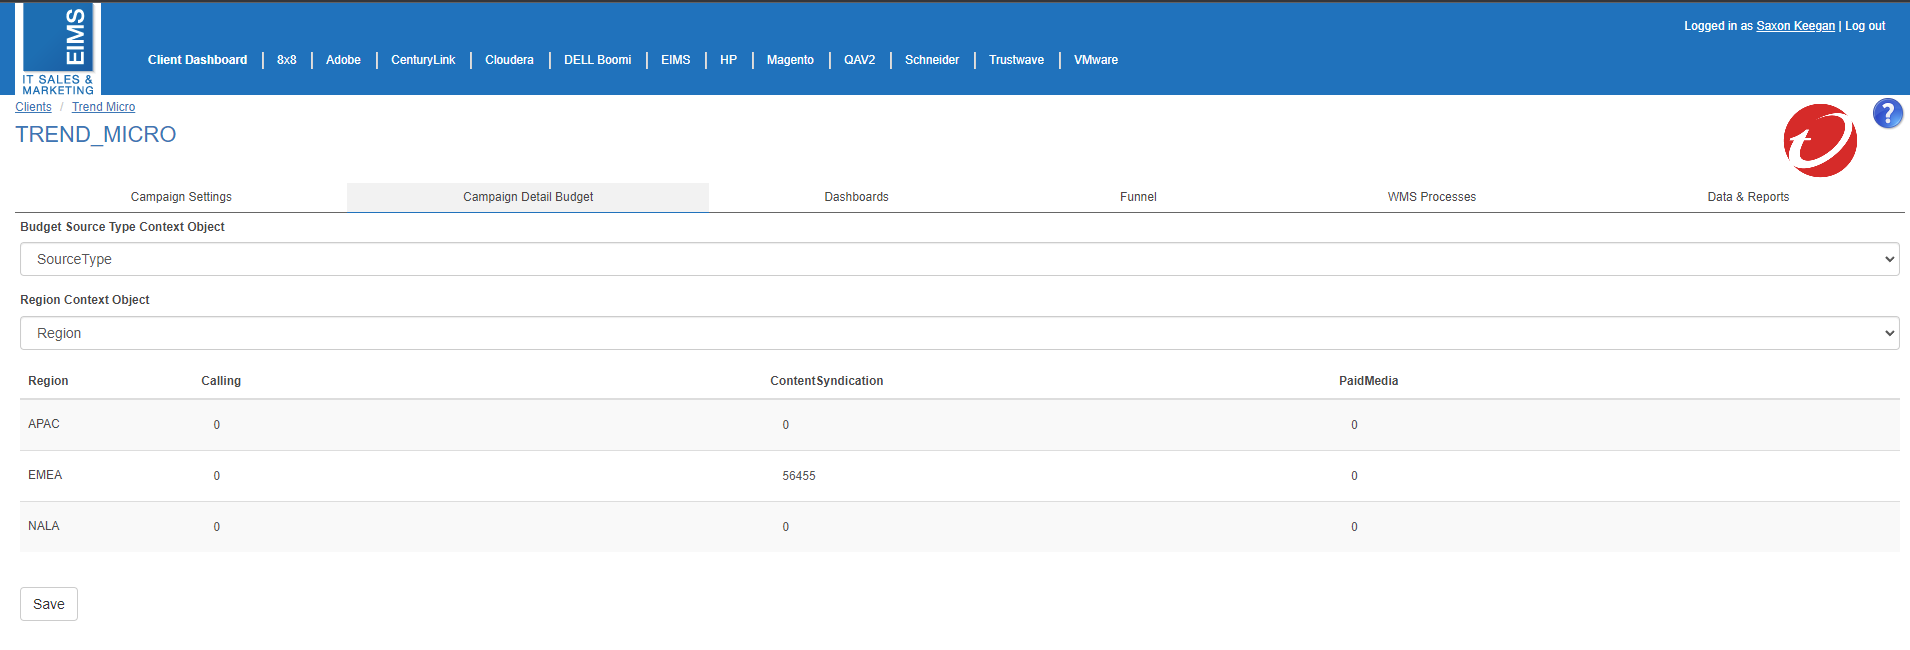
Now that the campaign process has been set we can begin configuring the budget breakdown. Select the Campaign Detail Budget tab and select the SourceType field from the "Budget Source Type Context Object" dropdown and the Region field from the "Region Context Object" dropdown. Once the correct fields are selected a grid will appear with the region values as rows and the Source types as columns. As each campaign is for a single region, only 1 of the rows under the ContentSyndication column will need to be populated.

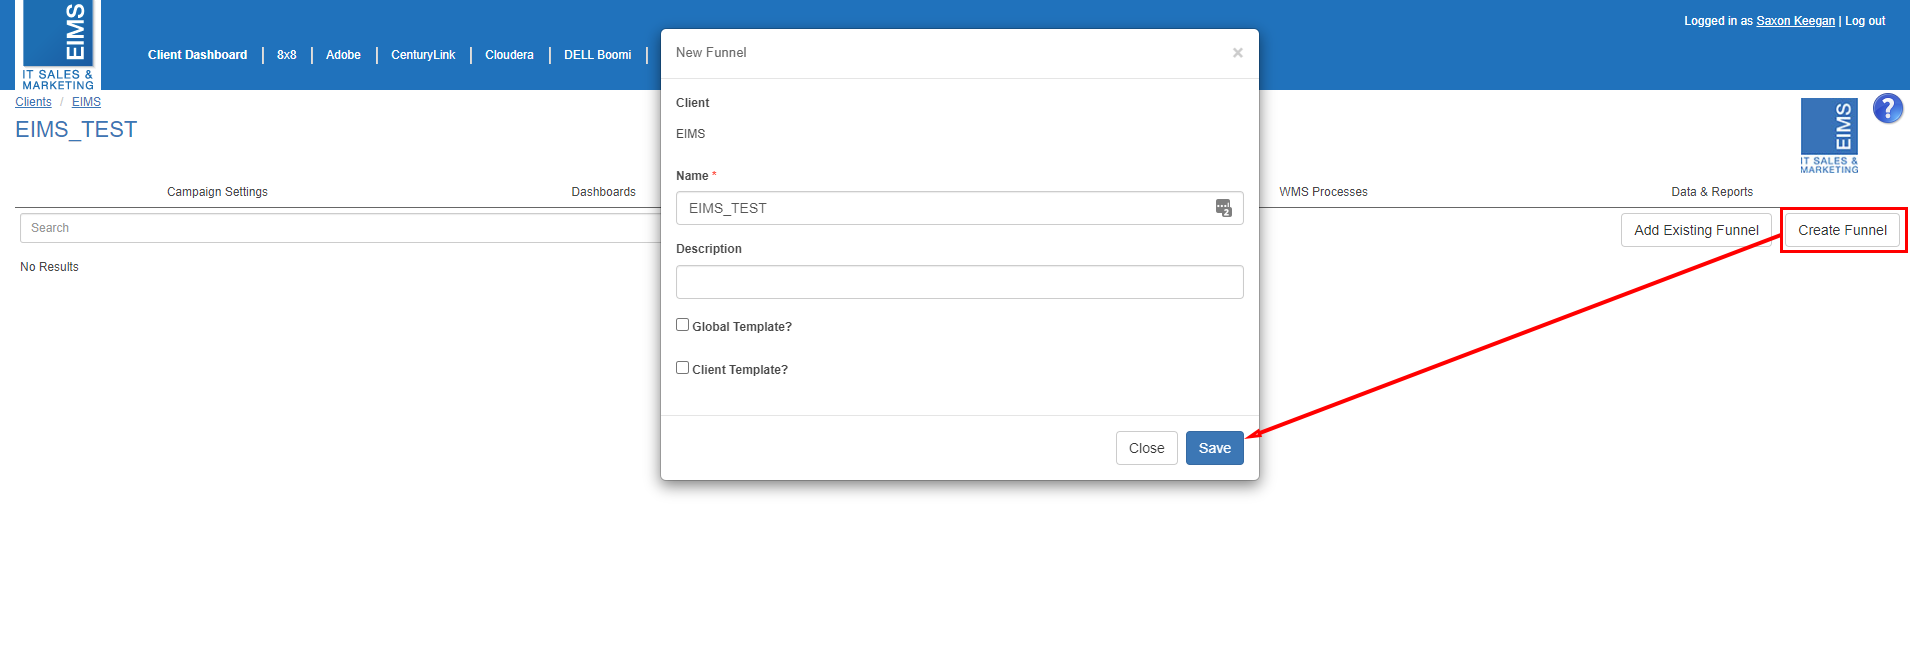
Create Funnel Configuration

Next we need to create a new funnel configuration and assign it to the campaign, we can do this directly in the campaign by selecting the funnel tab. Click the Create Funnel button, you do not need to set any of the details on the dialog box so click Save and the funnel config is complete.

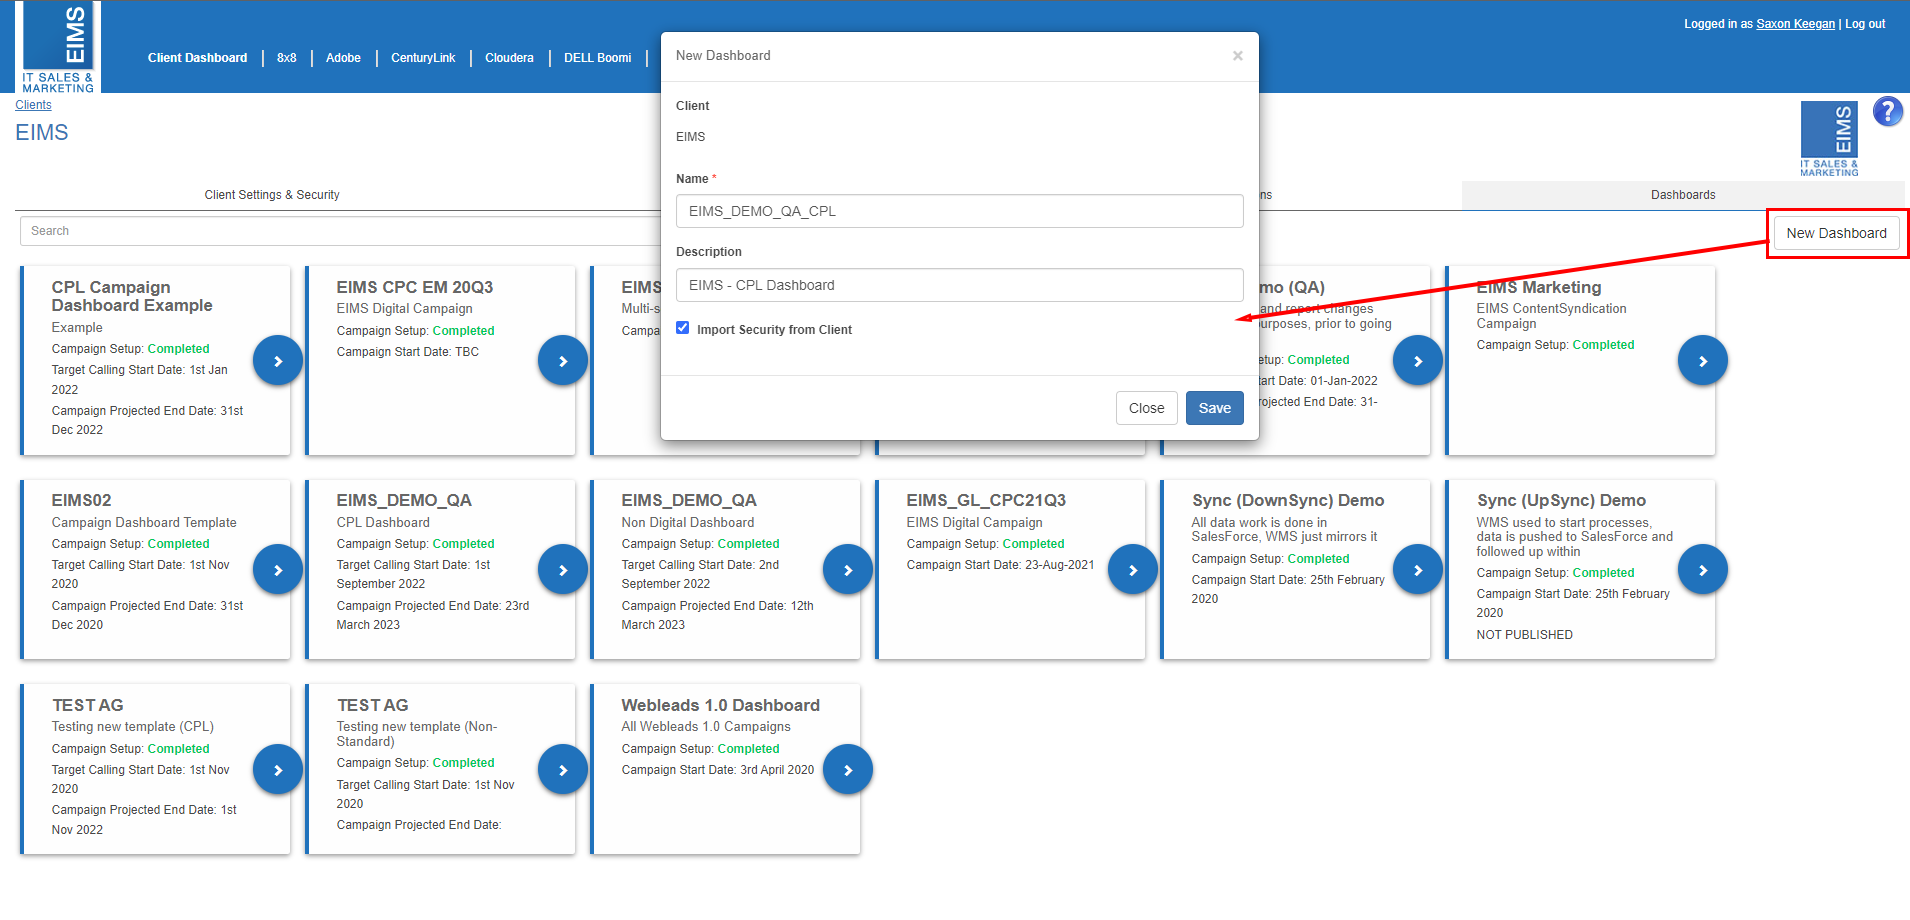
Generate Campaign Data Tables

Once all the previous steps have been completed, we can create the data tables. Click the Data & Reports tab and enter a sync time (Note: time is in UTC to adjust the value entered accordingly). The data tables within the data warehouse are synchronised every 24 hours, the time entered is the time of day the campaign is synchronised in the data warehouse.

set the Digital Agency Master Campaign ID to 0. CPL campaigns do not use Paid Media so we set this to 0 so no data is synchronised to this campaign.

Campaign Funnel Report

The campaign funnel report requires the standard Power BI Campaign Funnel Report template and will require a support request to be configured.

Publisher Report

The publisher report requires the standard Power BI Client Publisher Report template and will require a support request to be configured.

CPL Dashboard Setup

Once the funnel and publisher reports have been setup we can create the CPL dashboard. Navigate to the client and click the Dashboards tab. Click the New Dashboard button, enter the campaign name as the dashboard name, and add the following as the description: {ClientName} - CPL Dashboard (Example: Adobe - CPL Dashboard)

Ensure you check the "Import Security from Client" checkbox and click Save.

Once the dashboard is created, select the tile from the list and the edit dashboard page will load. Click the Load Template button and select the "CPL Campaign Dashboard (Client)" option from the Template dropdown. A list of fields will load and each field should be populated from the details provided as part of the New Campaign Setup Process. Fill in the fields and once done Click the apply button.

The dashboard will be automatically created with all the relevant field values populated in the correct tiles and buttons.

Click the Publish button and finally Save.

The CPL dashboard setup is now complete.

help_outline
close