menu

WebPlatform Documentation

Bulk Import

Why bulk upload?

The situation is: This is what you want to do - mass import of processes. You want to start many processes in bulk (in one go, instead of starting these off one by one).

This is how you can do it.

WMS Bulk Import - How it works:

  • In WMS/Processes select Bulk Import

Set Up your Bulk Import

    • Select process
      • You must be able to start
      • Start form cannot have any attachments
    • Upload file*
    • Select sheet
    • Enter unique name
    • Next

* You can download the template for the selected process (includes all fields in the start form). Populate and upload for processing in bulk.

Set up Deduplication Settings

    • Skip = Do not remove duplicates
    • Apply criteria = Remove duplicates
  • Add Match Conditions
    • Exact match
    • First x characters
  • Click Next to apply conditions
  • Match threshold can be changed to see more or less duplicates (use slider)
    • The slider can only be used if you have more than one field in your deduplication options

Duplicates

  • Expand rows
    • See match %
    • Duplicated fields are highlighted
  • Increase / Decrease Match Threshold
  • = See more or less duplicates
  • You can identify a record as not being a duplicate
    • Click delete icon in actions column
  • You can also instruct the system to not deduplicate the file
    • in Deduplication Settings select ‘Do not remove duplicates’ = Every row will be taken into the next stage
    • Click Next to apply your deduplication settings

Load a Mapping (from previous bulk import)

If you are repeating a bulk upload you can re-use the setting from a previous bulk upload

  • Just select the one you want to re-use
  • Confirm if you also want to import target dedupe settings
  • Click OK

Mapping

  • Set up Mapping for the import
    • Click on the dropdown to change the field to map
    • Click Next if you do not wish to add transforms and continue to the next stage of the import

Transformations

  • Click Configure to add a transform
  • Click Add New Transform Rule
    • Type a name for the transform e.g. Town to Country
    • Click Add New Transform
      • In the from type Bournemouth
      • In the To type United Kingdom
      • Repeat with London, Southampton…
      • Click OK
      • Click Close
    • Transform has been added

Re-use a transform for a field

If a transform rule has been used in a bulk import that has gone to end (meaning it was successful), it can be re-used in other mappings. Just select the relevant one and click OK.


Target Deduplication

  • Set up Deduplication Settings
    • Skip = Do not remove duplicates
    • Apply criteria = Remove duplicates
  • Add Match Conditions
    • Exact match
    • First x characters
  • Click Next to apply conditions
  • Match threshold can be changed to see more or less duplicates (use slider)
    • The slider can only be used if you have more than one field in your deduplication options

Starting processes

  • After Target Deduplication, click Next
  • Once the Process creation has been completed you will be taken to the results page
  • You can click on one of the process ID’s in the grid to go to the process diagram
  • On completion of the import you will receive an email with the results in a spreadsheet
    • rows with pass or fail

Mark the completed Bulk Import as a template

  • This will allow you to reuse the settings in this bulk import on future imports for this process

Automated Bulk Import

The objective is to start bulk imports automatically via email

Setup in Designer

Here's how it works:

  • Now that you’ve marked your Bulk Import template
  • Navigate to the process designer
  • Edit current version of the process you want to setup for automated bulk import
  • From the current live dropdown select “View Process Automations”
  • Select “New Bulk Automation”
  • Configure an email address for the process and give it a name. Domain for the EIMS WebPlatform is: @eims.campaigntracking.com*
    • Select the bulk import marked as a template
  • Determine who can send emails for this process for automated bulk imports
  • Save & Exit

* Each WebPlatform will have a different domain. Please check with Product Support before you set up an automated bulk import in another WebPlatform

How to send an Automated Bulk Import

Here’s how it works:

  • Enter the email address setup for the process
  • Optional: Include a subject line and content in the email body
  • Attach the bulk import template (populated)
  • Send the email
  • Person who setup the Automated Bulk Import can view the sent email in the inbox on the WebPlatform
    • User Directory – User Admin - Email Management
  • You will receive an email once the bulk import has completed
  • For WebPlatform users: Click the link in the email to view the bulk import
    • External users will only be able to view the attached spreadsheet

Automated Bulk Import set up checklist

Automated messages for loads

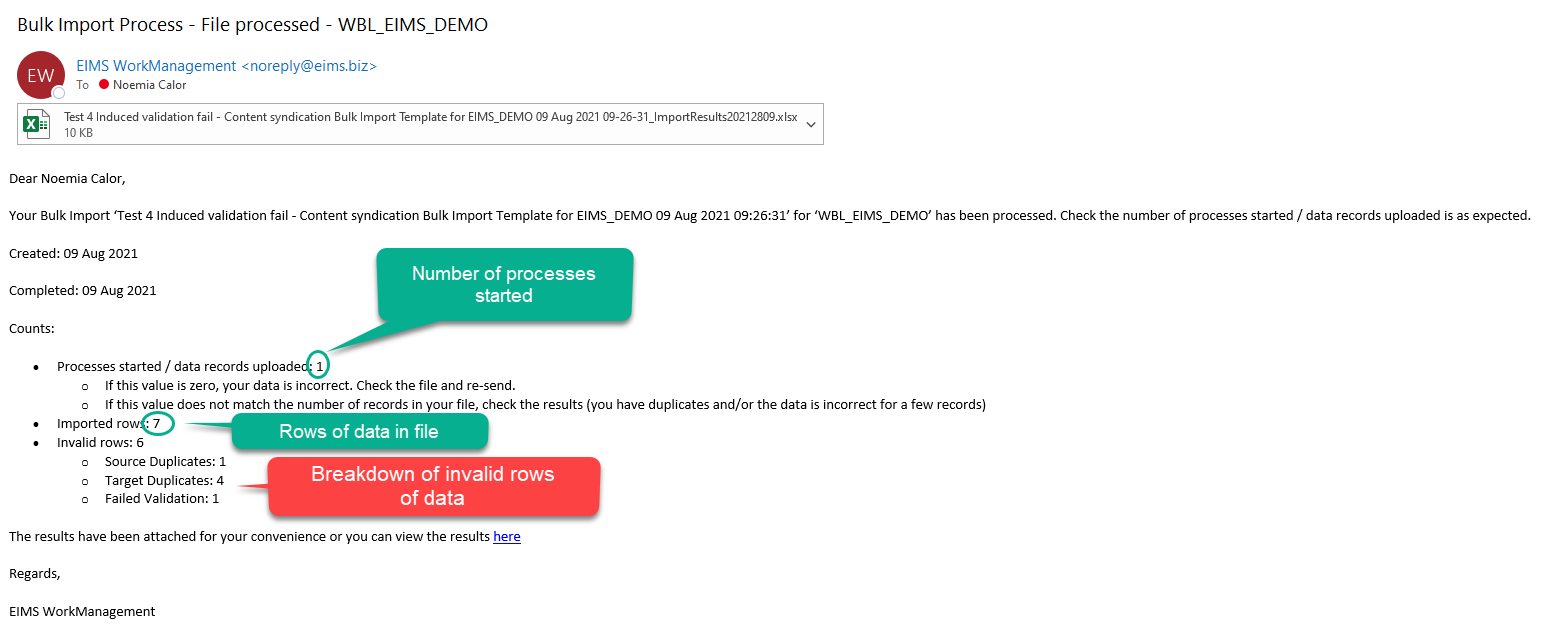
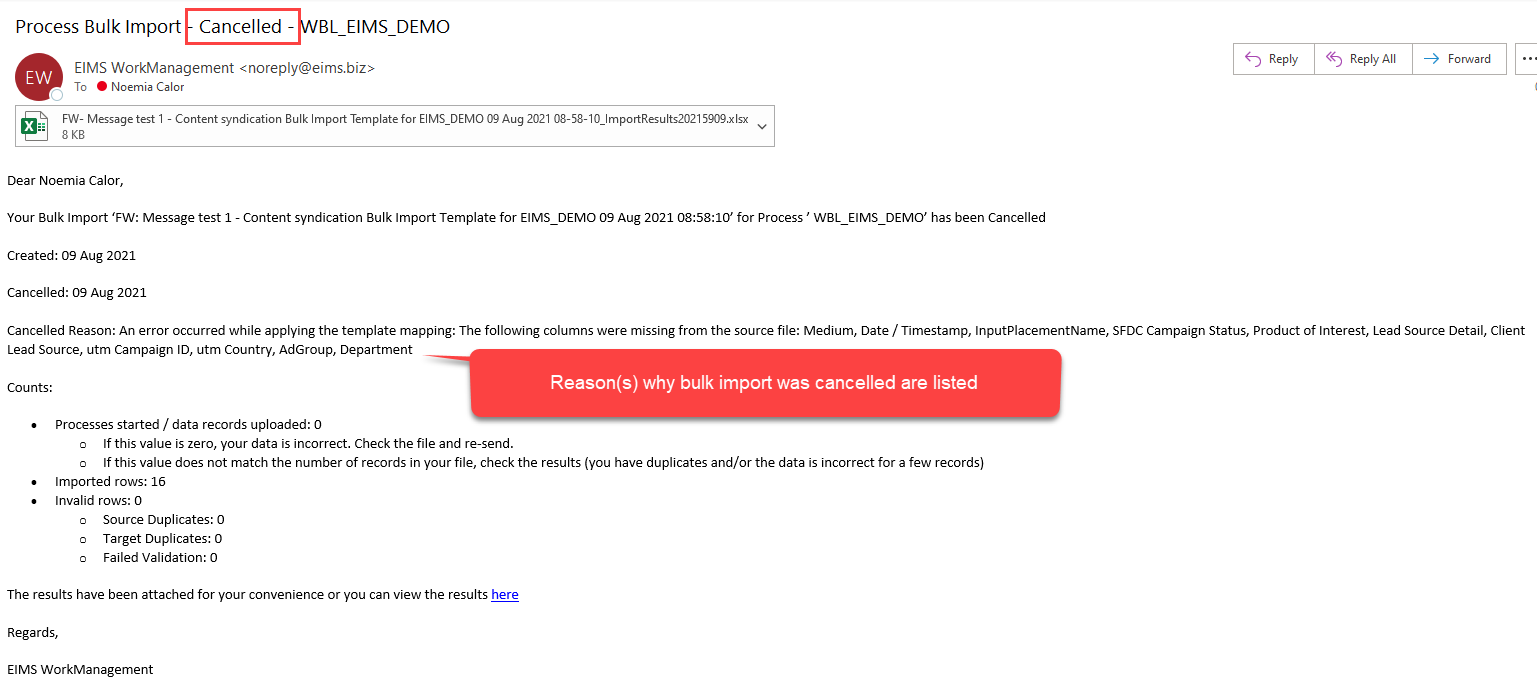
Each file that is emailed for bulk import of WMS processes will have a success or fail message. The sender will receive an automated email detailing the number of processes started, how many rows of data were received, how many invalid rows of data were found (a breakdown of source duplicates / target duplicates / failed validation). Here are a couple of examples and a short video:

  • File imported
  • Import cancelled

Checking Errors: What to do with Failed Rows

With rows which have failed in the import stage: amend the failed rows and import only the failed rows again

help_outline
close