menu

WebPlatform Documentation

Minions

What are minions?

Minions are a simple way of allowing processes to transfer data to external systems that processes wouldn't otherwise be able to interact with. To put it another way, minions allow processes to communicate with systems outside of WMS.

There are 2 primary ways of minions talking to other systems; a minion can go to the external system and ask for data to put into a process or it can wait for the external system to provide data to the process.

Minions are WMS's way of communicating with the outside world however, external systems may refer to this functionality as webhooks so if you have used webhooks then you will have a good understanding of what and how minions work.

How to create a minion

NOTE: Creating a Minion only applies when you need to retrieve data from the outside world. Check out the API URLs for outside systems sending data into a process.

Minions are configured in the process design when a process version is in the "In Progress" status. Open the WorkItem editor by clicking the  button in the action bar and select the minion tab in the pop up window.

The minion tab is where you'll find the minions that have been setup for the process however, you will only see minions for the selected WorkItem and those that have been setup to launch on process creation. This means you must select the WorkItem in the process diagram before clicking the button to create/edit minions for a specific WorkItem.

A new minion can be created by clicking the  
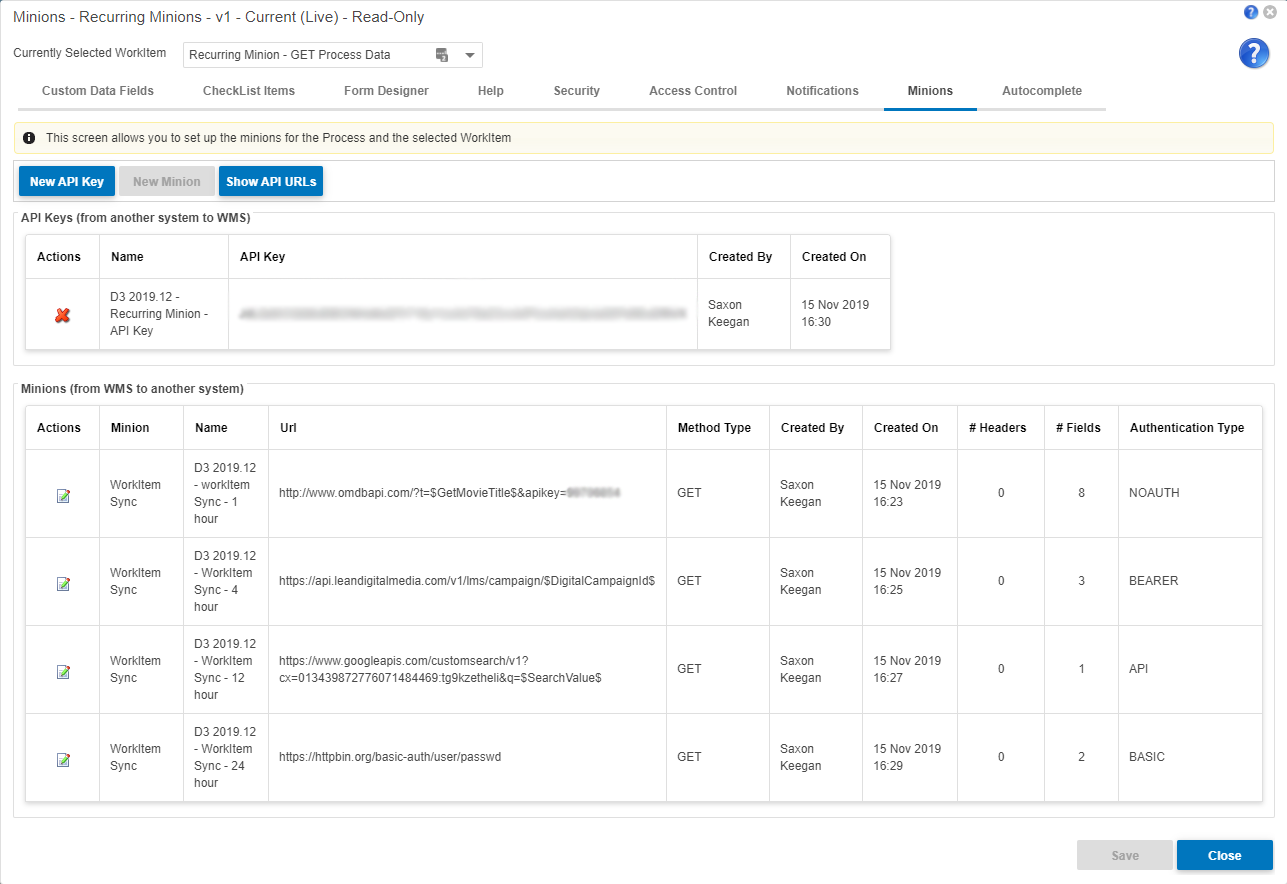
button in the action bar. To edit existing minions click  button in the Minions (from WMS to another system) grid.

You can create a new API key for the process by clicking the button in the action bar, this is used for authentication when using the API URLs. To delete existing API Keys click button in the API Keys (from another system to WMS) grid. 

API URLs

The API URLs is how an external system links to the process in WMS. They can be accessed by clicking the button and they allow external systems or other minions to interact with the process but before it can be used an API key must be configured (see the How to create a minion section above). There are 3 ways external systems can interact with the process using API URLs:

  1. Update field values
  2. Attempt to complete the current active WorkItem
  3. Retrieve the current active WorkItem

As the API URLs apply to the process design each interaction requires a form of identifier to target specific processes or groups of processes, this means that each interaction has two types of URLs; By process ID or By Key Value.

Minion Properties

Before a minion can go to work we must give it the necessary schedule, location, authentication, how and what data to retrieve for the process. This is done by configuring a set of properties for a minion.

Minion types

The minion schedule is determined by the type of minion we choose and will determine when the minion will be execute during the process. This is done by choosing one of the minion types from the dropdown.

Minion Type What it does
Process Activated The minion will be triggered as soon as a process instance has been created.
Process Completed The minion will be triggered once the end WorkItem has been reached the process status is completed.
WorkItem Activated The minion is configured for a specific WorkItem and will be triggered as soon as the WorkItem becomes active.
NOTE: This option is only available when a WorkItem has been selected in the process diagram before opening the WorkItem Editor window.
WorkItem Completed The minion is configured for a specific WorkItem and will be triggered as soon as the WorkItem is completed.
NOTE: This option is only available when a WorkItem has been selected in the process diagram before opening the WorkItem Editor window.
Process Sync The minion will be triggered indefinitely on a set interval until the process has been completed. You can configure the minion to trigger every 1 hour, 4 hours, 12 hours, and 24 hours. This is done in the frequency dropdown and will only become visible when selecting the "Process Sync" minion type.
WorkItem Sync The minion will be triggered indefinitely on a set interval until the WorkItem has been completed. You can configure the minion to trigger every 1 hour, 4 hours, 12 hours, and 24 hours. This is done in the frequency dropdown and will only become visible when selecting the "WorkItem Sync" minion type.
NOTE: This option is only available when a WorkItem has been selected in the process diagram before opening the WorkItem Editor window.
Before Process Started The minion will trigger when a user fills in and submits a start form for a process. This option will add additional validation functionality to the start form and will prevent the user from kicking off a process instance if the minion fails to execute.

Before WorkItem Completed

The minion will trigger when a user fills in and completes a WorkItem. This option will add additional validation functionality when completing a WorkItem and will prevent the user from completing the WorkItem if the minion fails to execute.
NOTE: This option is only available when a WorkItem has been selected in the process diagram before opening the WorkItem Editor window.


WorkItem Auto-Complete

We can instruct the minion to attempted to complete the current active WorkItem after the minion triggers by selecting the checkbox below the minion type. WorkItems will only auto-complete if all the standard requirements are met for a WorkItem to complete, including all mandatory fields must be populated before the WorkItem can be completed.

Minion Name

The minion name is purely for the purpose of identifying the minion in the grid of the WorkItem/Process editor. Name the minion appropriately so it is easily recognised.

URL

The minion needs to know a location of an API endpoint to know what and where it must go to retrieve or give data, minions do this using the URL field. You must enter the URL for the endpoint that you need the minion to call, if you are unsure what the endpoint URL is then you can refer to the documentation provided by the external system for the API.

To familiarise yourself with API documentation, checkout the ECCentral API documentation. Each section of the documentation represents a unique endpoint that the minion can push data to or will return data based on what the endpoint has been designed to do. Each endpoint has details of the URL that you must use, the method that must be used to successfully talk to the endpoint (see method types for more information), the data that can be passed to the endpoint in JSON format (see the JSON Template section for more details) and the data you can expect to be returned from the endpoint in JSON format.

Authentication Type

Most APIs will require some form of authentication to make sure that the requests are legitimate and are not malicious. There are different authentication types that are used as standard and the type used will be dependant on what the external API has configured. Once again check the API documentation for details on what type of authentication is required and how to get the neccessary keys.

Minions support 4 types of authentication and if you are unfamiliar with the different types a basic description is provided below:

NOAUTH

The first option is "NOAUTH" which is used when the API endpoint does not require any authentication. As mentioned most APIs will require some form of authentication however, there are some occasions where authentication is not required. An example of NOAUTH is configuring a minion to kick off an instance of another process; embedded start forms do not require any authentication so NOAUTH is the suitable option.

API

The second option is "API" which should be used when an API key is required to authenticate. API keys are a unique string of characters and will typically require you to generate the key through the external system, good API documentation will provide a guide on acquiring the API key.

You configure the minion with an API keys in 3 parts; the key Name, Key Value and the Add To.

  1. Key Name - This is essentially the lock for the key. You can typically find the key name in the API documentation.
  2. Key value - This is the unique API key provided/generated by the external API. This will be a unique string of characters and must be kept safe! 
  3. Add to - Depending on the way the endpoint has been configured, you may need to add the API key as a parameter to the URL or in the header of the request. The add to dropdown allows you to choose between the 2 options.

BASIC

The third option is "BASIC" and most users will be familiar with this style of authentication as it works a lot like logging into a website, account etc...

Basic requires the minion to provide a username and password to authenticate as a valid request. Typically, you will need to setup the username and password on the external system however, check the API documentation for full details.

BEARER

The final option is "BEARER" and should be used when a bearer token is required. Bearer tokens are a way of telling the external service that you are authenticated to receive Access Tokens.

Access Tokens are valid for a short period of time so the Bearer Token allows our minion to go and fetch another one when the old one has expired.

Failure Email

TIP: To learn more about status codes, checkout the MDN web docs on HTTP response status codes.

When a minion makes a call to an API, the endpoint will return a status code to indicate if the request was successful or not. Enabling the failure email checkbox allows you to configure an email if a failure code has been returned when the minion makes its request. You can customise the email by clicking the  button and setup the recipients for the failure email.

Method Type

TIP: To learn more about method types, checkout the MDN web docs on HTTP request methods.

Method types refer to the standard HTTP methods used to make HTTP requests across the web and this tells the minion "How" to communicate with the endpoint. Minions are limited to the follow method types:

Method Type What it does
GET The GET method is used when you need the minion to retrieve data from an endpoint and to be added to process fields or used with another minion.
POST The POST method is used when you need the minion to supply data to the external system or to notify the external system of a change in state on the external systems server.
TIP: Think of the POST method as adding data to the endpoint.
PUT The PUT method is used when you need the minion to update data that already exists on the endpoint with the data that has been provided by the minion from the process fields.


JSON Template

When a minion has been configured with a method type of POST or PUT then a JSON template must be provided so the minion knows "What" data to provide the endpoint with. JSON is an open standard file format, and data interchange format, that uses human-readable text to store and transmit data. The JSON template for minions is like a set of instructions that tells the minion how to map external system fields to process field values.

JSON Template Example:

{
  "companyId": 123,
  "siteId": $Existing Site$,
  "contactId": $Existing Contact$,
  "companyAndSite": {
    "companyName": "Test Company Ltd",
    "siteName": $New Site$,
    "address1": $Address Line 1$,
    "address2": $Address Line 2$,
    "address3": $Address Line 3$,
    "town": $Town$,
    "county": $County$,
    "postCode": $PostCode$,
    "country": $Country$,
    "telephone": $Direct Phone$
  }
}

The referenced fields on the left side of the colon in the example above are the fields you want to map to in the external system. To the right of the colon are the values we want to map to the external field. You can add static values by typing the value into the JSON template directly however, number values and string values have different syntax; string values must be wrapped in quotations (" ") whereas number values are entered without quotations (see companyId and companyName in the example above).

In most cases you will want to map a process field value instead of a static value. The syntax for this is $FieldName$.

help_outline
close