menu

WebPlatform Documentation

Process Designer - How to use it

download

Process Designer is aligned with Lean, What is Lean?

  • Lean = Doing More with Less
    • Less Time, Inventory, Space, Labour and Money
    • A way of systematically achieving profitable growth
  • Systematic Elimination of Waste
  • Lean – Organisation focuses on its core capabilities and devoid of any waste
  • Lean Enterprise – approaches that focus on the elimination of waste in all forms
    • smooth, efficient flow of materials and information throughout the value chain to obtain faster customer response, higher quality and lower costs

Process designs are subject to continuous improvement over time - Kaizen is a change for the better and it’s a cultural change! Kaizen is good change that drives improvement.

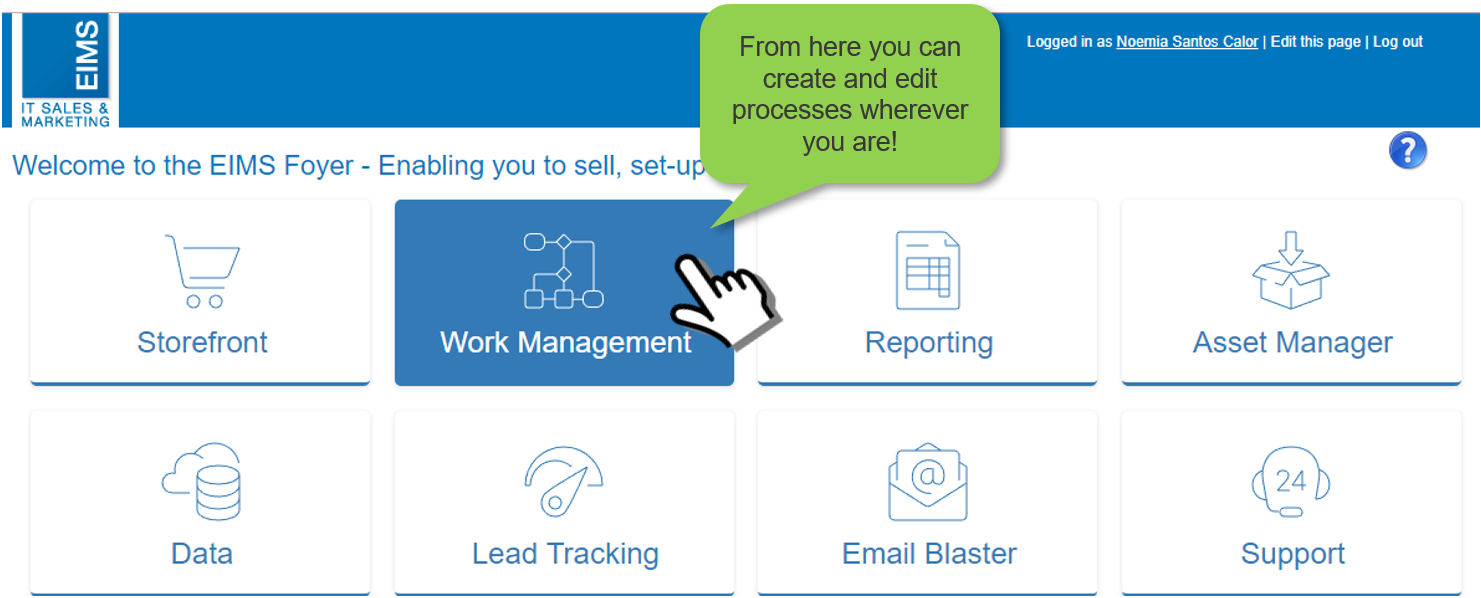
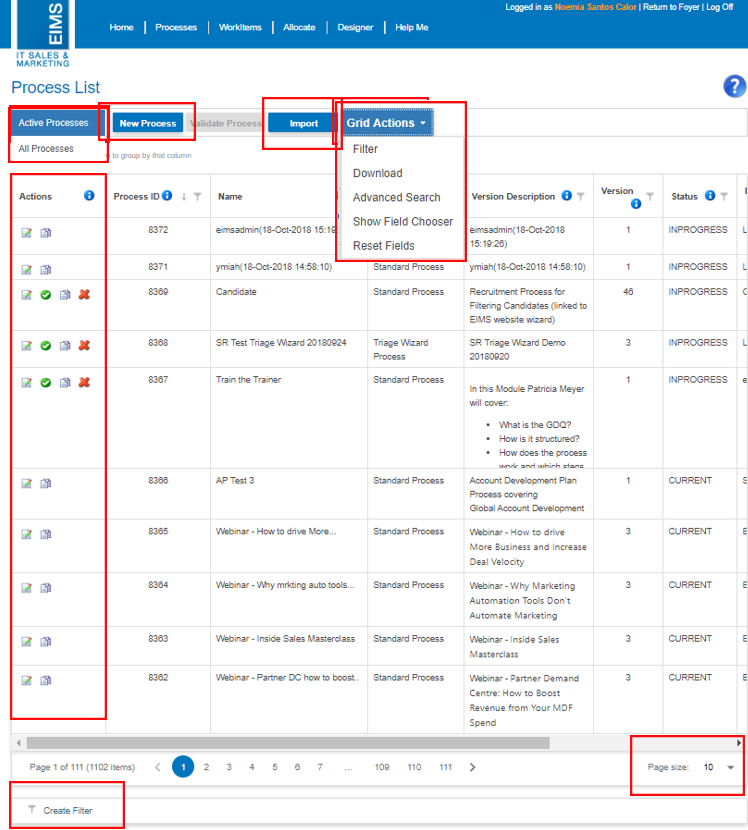
EIMS use WMS as a process to manage process! Process designer is used to create process that is widely adopted and improves efficiency and advocates lean.

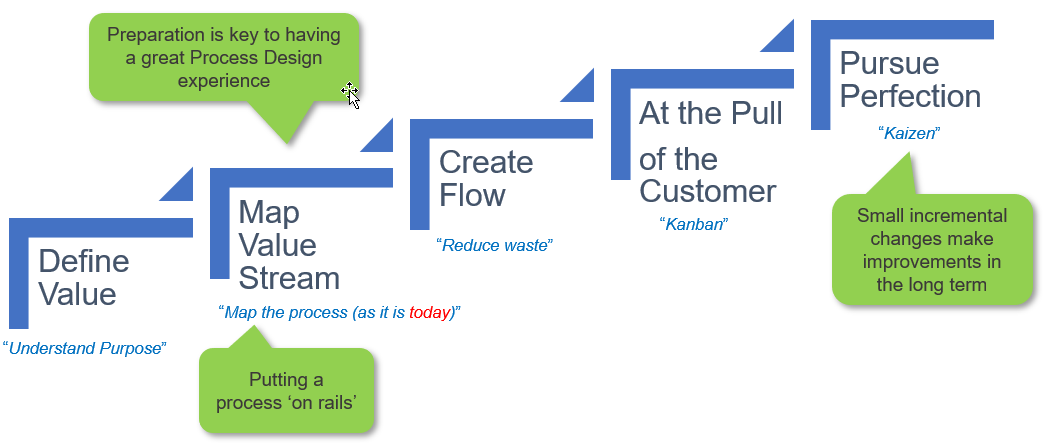
Principles of Lean Thinking

There are 14 principles of Lean:

  1. [understand the] Purpose
    • Outside-in thinking, Big Picture
  2. [map the right] Process
    • End to end = flow as it is done today
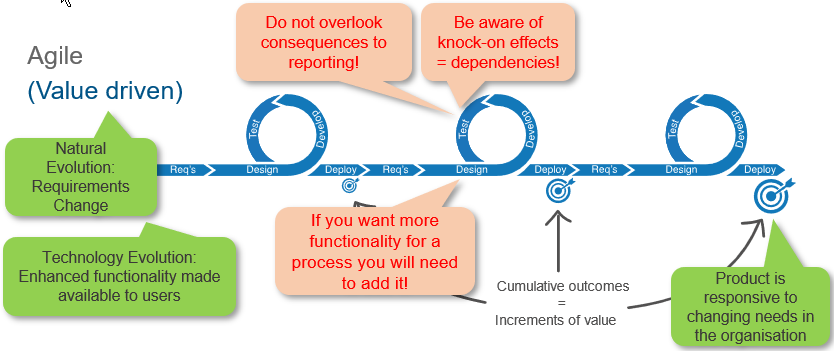
  3. ^ Pull
    • e.g. Order a new process using service in Storefront
    • e.g. JITT - Help content so that users can do the job
  4. Level the workload
  5. Quality improvement
  6. Standardise
  7. Visual controls
  8. Technology
  9. Leadership
  10. Excellence
  11. Respect partners
  12. Root cause
  13. Slow decisions
  14. Learning Organisation


However designers will focus mostly on these:

Using these principles is a state of mind!

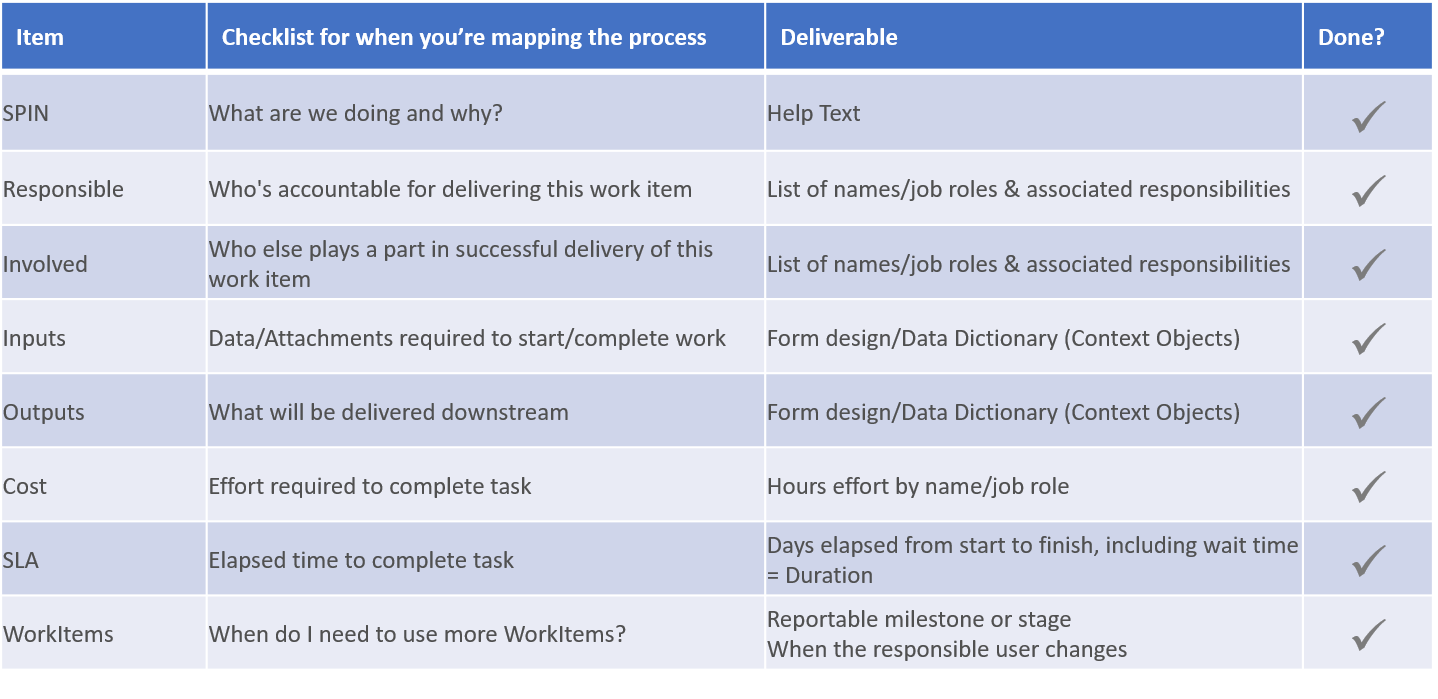
For a designer the three most important principles to remember are:

  1. Understand the purpose
    • Clarifies thinking and improves decision making
    • Seek to understand
    • Outside in thinking - Look at it through the eyes of the client: If you were the customer would you be happy to pay for what you are doing?
    • Big picture - see things end to end
      • the beginning of the process = customer demand (creates value/sees value)
      • the end of the process = client pays for it, sees value. Client pays with a smile on their face - couldn't have gotten better value elsewhere
  2. Map the process
    • Make the process manageable - Show not Tell
  3. Learning Organisation
    • People who understand what they're doing and why they're doing it
    • Just-in-time training (JIT)

The very first thing a process designer must do is understand the purpose - why is the process necessary and what is it for. Outside in thinking is key - Look from the eyes of the customer so that you understand your true purpose!

  • Identify the value stream: how much would you pay?

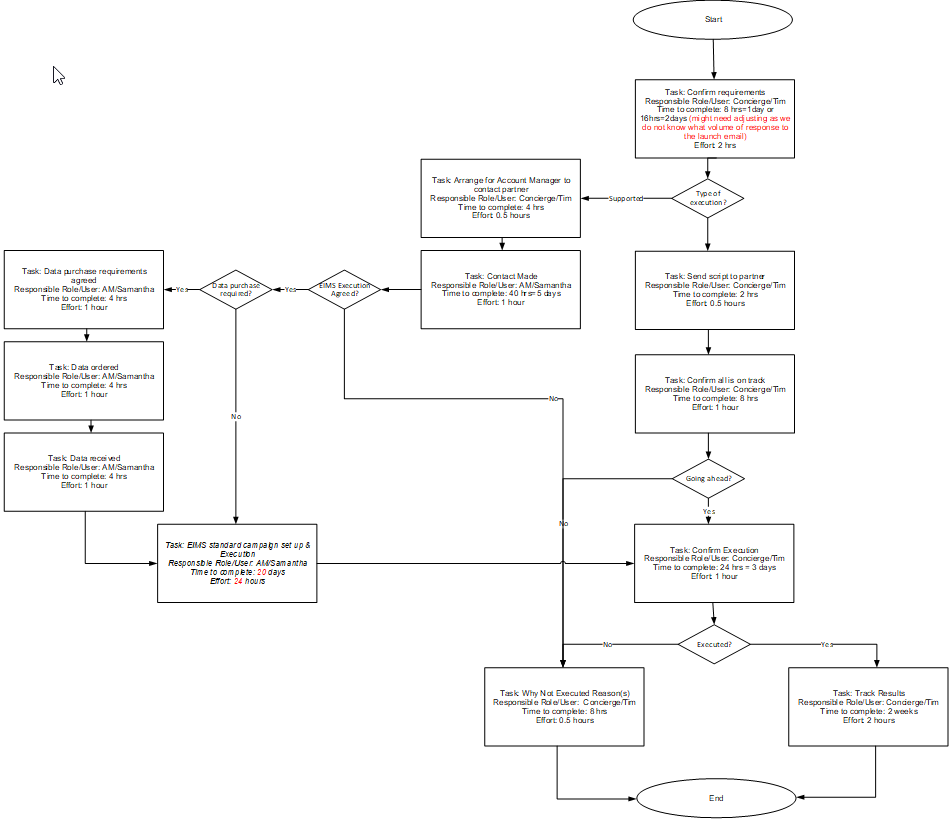
Following best practice the next step is to map the process. This is a time and motion study. Which tasks add value => value stream/chain.

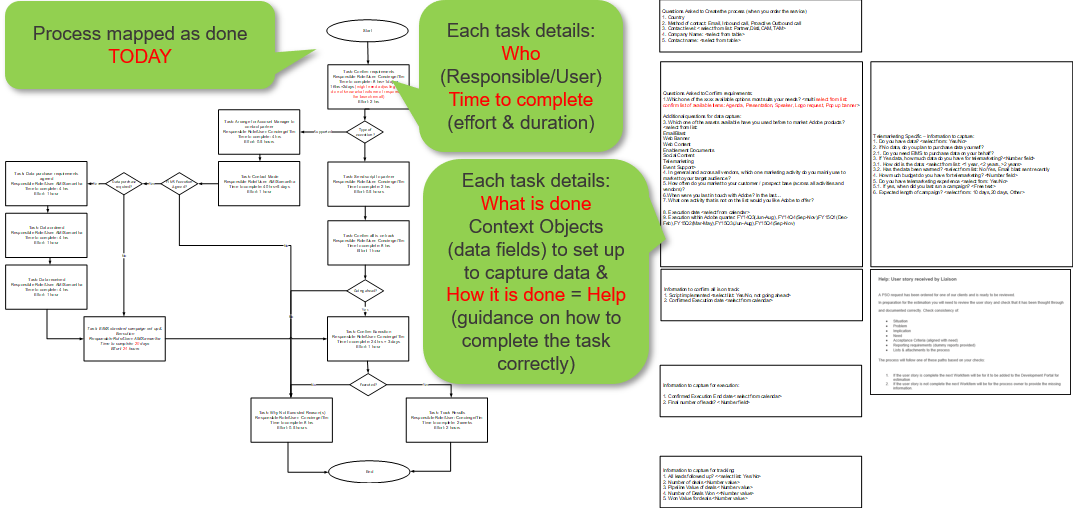
Map exactly what is done. Observe = Show not tell. Document exactly what is done so that you can share this knowledge with all users

  • You have shadowed the most experienced users to map the process and you must ensure that the knowledge required is documented for all other users who will interact with the process Task/WorkItem in the future irrespective of their level of knowledge (new users, experienced users, super users).
  • Identify what happens TODAY
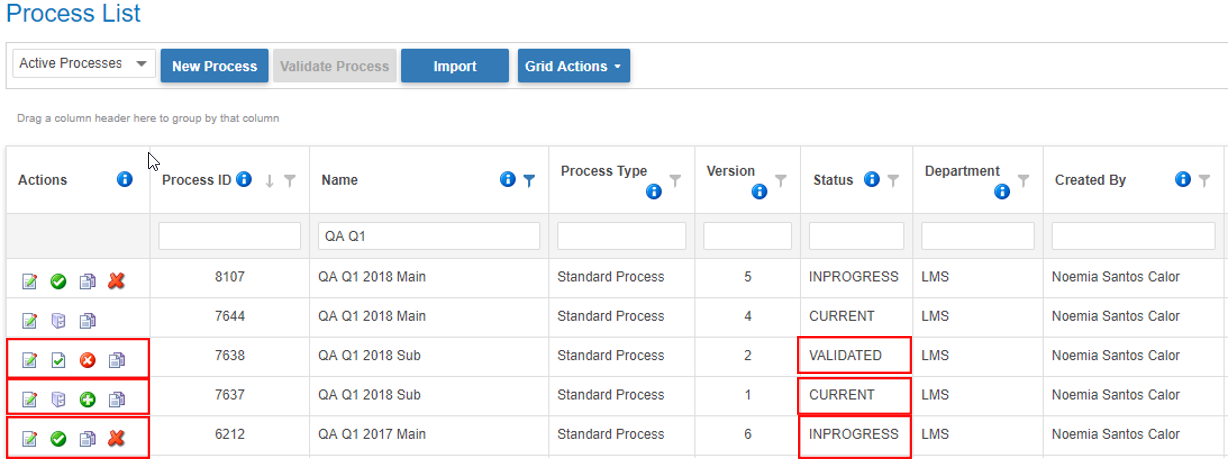
    • You can only improve a process once it is standardised

Important Questions to ask that will aid design of the process:

  • What do users do today to get the job done? => addresses purpose
    • This will give you the list of tasks that are done in order to achieve the end outcome
    • It will also give you the list of data fields you must set up to capture or display information
  • Who does it? => allocation rules
  • How do they go about doing it? => guidance/help files in SPIN format
  • Time: How long does it take them to complete the task? =>Effort & Duration

By the time you have completed mapping the process you will have:

  • a full list of data fields/context objects that need to be set up
  • 'Help' content for each task so that there is knowledge share
  • flow/design that meets the purpose you set out to achieve

Checklist for when you’re mapping the process - What you must have

When you finish mapping your process (exactly as it is done today) you will have the following for each Task/WorkItem:

  • SPIN
  • Responsible
  • Involved
  • Inputs
  • Outputs
  • Cost
  • SLA
  • Well defined next Task/WorkItem

This checklist defines the deliverable for each of these steps.

What you should have at the end of the mapping stage

The right way to create a process - Refer to the mapping checklist as you go!

1. Do it yourself (shadow the right user - the person who does it every time

2. Note down how you (they) did it, not leaving any of the steps out

3. Structure the steps into a high-level overview

4. Break the high-level steps down 

5. Meticulously detail each small item, using images, videos and external references to explain everything (learning organisation)

6. Identify how long it takes to do tasks and how (learning organisation - share knowledge with all users)

7. Identify who does what (allocation rules)

Best Practice for Design: Keep it together

  • If a user does lots of tasks in the process at the same time use a single WorkItem instead of many
  • Add a new WorkItem when the responsibility changes or when there is a status change (reportable milestone)

For IT: Request Datasources be set up

Why do we use process designer?

As part of streamlining and standardising repetitive tasks in our organisation, we analyse the actions/tasks that constitute an end to end process

  • This analysis allows us to understand what it is that needs to happen to achieve the end outcome
  • At the same time user best practice and experience is captured to make available to all – makes the process easily accessible and smooth to complete
    • learning curve shortened

We can then design processes (using this application) with a list of main actions (WorkItems) that users need to complete in order to achieve the end outcome

  • Within these WorkItems we ask users to answer questions to validate:
    • what they have done, also attach evidence of completed actions
    • determine what they want to do next
  • We also provide Help pages where there are itemised instructions on how best to complete the tasks within each WorkItem
    • this is where we can guide and share our best practice experience
  • Processes can also have checklists, automated emails and notifications
  • Best practice: V1 of the process maps actions as they are today (before standardisation)

As an organisation, using processes and a standard allows us to make significant savings and immediate ongoing improvements, because:

  • All users follow the same set of actions
    • No re-inventing of a very well established wheel
    • Training is standardised & easy to replicate (steep learning curve)
  • All users have access to the same help/guidance
    • Centralisation of knowledge and experience/best practice
  • All users know what has happened already and what will follow (Clarity: Process Diagram & Preview Mode)
  • All users know what is expected of them (Clarity: Active WorkItems in WMS)
  • Any enhancements/changes to a process apply to all users once made
    • Effective and efficient change management

What we need to remember for new functionality…

Our business methodology is agile which is value driven instead of the classic waterfall methodology which is plan driven

As an application process designer is constantly being improved and if you want to use new functionality in your process design you need to think of the implications of change.

It is very important to think of knock on effects across other sections of the business when we decide to change any existing process.

The butterfly effect is the idea that small things can have non-linear impacts on a complex system. The concept is imagined with a butterfly flapping its wings and causing a typhoon. ... Simple systems, with few variables, can nonetheless show unpredictable and sometimes chaotic behaviour…

This means that if you want to implement new features, you will need to take into consideration how this will affect your process and all of it’s dependencies (especially reporting & other processes)

Test, Test, Test!

Where can you find Process Designer?

Process Designer: Process List

Process List

  • Where you can create & edit processes

Filter processes

  • Active Processes
  • All Processes

New Process (to Create one)

Import a process from another WebPlatform

Grid Actions: Standard FSG

  • Filter, Download, Advanced Search, Group,…

Page size control

Actions available are based on the status of the process & your level of access to it (Security)

Current=Live

  • Edit
    • Security settings only
  • Archive Process
  • Create New Version
  • Copy Process

Validated

  • Edit
  • Cut Process Live
  • Reject
  • Copy Process

In Progress

  • Edit
  • Validate Process
  • Copy Process
  • Delete Version

Understanding the tool bar

Edit Process: Action buttons on tool bar

  • Close
  • Save
  • Validate Process
    • Check that your process passes all existing automated validation rules
  • Process/WorkItem Editor
    • Add Custom Data Fields (Context Objects)
    • Set Data Field Visibility
    • Set up Security
    • Create Forms/Checklists/Help files
  • Zoom In
  • Zoom Out

If process status is ‘In Progress’

  • You can Preview (test your process in preview mode) - this does not replace actual testing of your process by creating instances of it. This functionality allows a cursory run through of your forms and help. It does not cover transitions, automated items/notifications or timers.

If process status is ‘Validated’

  • You can Cut Process Live, Reject, Preview

If process status is ‘Current’

  • You can Publish to Storefront, Preview

Export/Print functionality

  • Based on your user access settings, you can print the entire process: its WorkItems, Helpfiles, Context Objects…
  • Formats available: Portable Process Format (*.prd), Visio XML format (*.vsdx) or print to a printer or PDF
  • You can print the diagram in Designer in visio format
  • You can print the process diagram only
    • send to a printer 
    • save as PDF
  • You can print the process documentation
    • save as PDF
  • Portable Process Format *
    • Allows you to export a process from one WebPlatform and import it into another
    • PRD file saves to your ‘Downloads’ folder
      • It contains all of detail contained within the exported process
  • Visio XML Format
    • Allows you to export a process into visio format

* Best practice: Export/Import of processes across WebPlatforms

Must Have – the 2 WebPlatforms must be on the same version of the system!

Things we need to bear in mind…

  • WebPlatforms do NOT share the same users, roles or departments
    • So, if in the process design you have User Context Objects, Role based allocation or specific users assigned to WorkItems – these allocations will break
  • WebPlatforms do NOT share the same Databases or Datasources
    • So if in the process design you have Context Objects of field type: List of Values from a Datasource - these will not work
  • If the process you want to import has subprocesses, these need to be imported first so that you can then validate the imported process – if not done, the validation will fail indefinitely
  • If your import has errors a pop up will load with the errors found. These must be corrected before the import is re-attempted

How to Import a process into another WebPlatform

  • Export the process
  • Go to Designer in the other WebPlatform
  • Click ‘Import’
  • Browse for the file
    • In your ‘Downloads’
  • Select Option:
    • Import this Process as a new, standalone Process
    • Import this Process as a new version of an existing Process
  • Select a Department
  • Process Name
  • Import
  • Check the imported process

Basics: How to…Create a New Process

‘New Process’ will take you direct to the Edit Process page

  • Process default name = <Logged In UserLogin> (Current Date and Time in UTC 'dd-mmm-yyyy hh:mm:ss')
  • Followed by V1 (first version for your process)
  • Process status = In Progress - Editable
  • WorkItem shapes available to you will depend on the Process Type (default WorkItems in image)
  • Drag shapes you want to use onto the Designer grid


Moving the diagram

  • + & - keys on the keyboard zoom process in & out respectively
  • Cursor keys on the keyboard move the selected WorkItem by 1 step of the grid
  • When a WorkItem is not selected the cursor keys have the effect of clicking the corresponding direction button in the compass rose

When finished click ‘Close’ or if you want to save the process permanently, click ‘Save’

Drawing the process: WorkItem shapes

Note: Shapes need to be appropriately spaced, if too close you will get a warning from the Designer: ‘Shape needs more space to locate’

Standard WorkItem Shapes to use

  • Start
  • Standard WorkItem
  • Transition (creates a decision point)
  • Automated Item (system generated email)
  • Sub-Process (Linking another process into the present one)
  • Timer (delaying next WorkItem)
  • End

Just drag and drop WorkItems into the Designer

  • WorkItem will be grey whilst being created in the database
  • Once created in the database the WorkItem will turn white
  • Where the same shape is used: System will automatically number WorkItems as you drop them

Renaming of WorkItems:

  • name of the WorkItem is what the users will see in their Active WorkItems list (this is truncated at 50 characters)
  • WorkItems cannot have the same name
    • Validation will prevent you from saving a duplicate WorkItem name

Standard Processes must have a Start & End WorkItem

If you want to delete a WorkItem shape you have added to a design

  • just click on the shape (it will have a highlighted blue border)
  • then press delete on your keyboard

Drawing the process: Connectors

Once you have all of your WorkItems in place you can connect them

  • Highlight the WorkItem
  • Hover over the exit points
  • Drag a line from the exit point you want to use to connect From
  • to the destination WorkItem (To)
    • = entry point
  • Your connector will be created

Things you need to remember…..

  • You can connect To and From all WorkItems with a few exceptions
    • Start WorkItem – only draw from
    • End WorkItem - only draw to
    • Transition WorkItem - only draw to
  • Note: Connectors cannot be done from Transitions – you MUST use the Transition Editor for your process to work without fail

If you want to delete a connector you have added to a design

  • just click on the connector (it will turn blue)
  • then press delete on your keyboard

Save your process

When you are ready to save your work, and re-name your process, click ‘Save’

The ‘Edit Process’ pop up will appear where you can overwrite the default settings

  • Process Name: prepopulated with process default name
  • Description & Version Description: prepopulated with process default name
    • Unrestricted number of characters can be used
  • Department: pre-populated with default department for logged in user
  • Type Of Process
    • Standard Process (default)
    • Triage Wizard Process
  • Next step is to ‘Save’ or ‘Cancel’

Note: Unlimited descriptions also apply when you Create a New Version of a process

Create a new version for your process

You can create a new version for ‘CURRENT’ (Live) processes

  • Click on the ‘Create New Version’ icon in the grid
  • The ‘Process Designer - Create New Version’ page will load
  • Read-only fields:
    • Process Name
    • Department
    • Type Of Process
  • Editable fields:
    • Description & Version Description: prepopulated with detail saved when the previous version of the process was created
  • Next step is to ‘Create & Edit’ or ‘Cancel’
  • New version of the process will be visible above the process & in the Process List grid
  • A process version can be deleted by clicking on the ‘Delete’ icon
    • Confirm you want to delete this version of the process

Warning for processes that have dependencies e.g. data sync

A WMS process can be synced with another system. If you create a new version of any such process you will be warned by the system.

An example below.

I clicked the 'create new version' icon for a process that has an existing data sync.

The system is warning me of it's existence and reminding me to check automations. This is to make sure I do not break the data sync...

help_outline
close