menu

WebPlatform Documentation

Understanding WorkItem Properties

Understanding WorkItem Properties

Each WorkItem shape has a set of properties, some of which are common such as: Process Id, WorkItem Id, Name, Image, Description, but also others which are specific to the WorkItem shape.

Some examples:

  • 'Allocation Trigger' is a property for Standard (WorkItems), SubProcess, Automated (Items)
  • 'Time delay (hrs)' is a property for a Timer
  • 'Transition Config'is a property for a Transition

Standard WorkItem

  • Info Icons: If you hover over these you will find the definition for each one of the fields

Properties you can change/update:

  • Name
    • Name of the WorkItem is what the users will see in their Active WorkItems list (this is truncated at 50 characters)
  • Checklist
    • This field will let you know how many checklist items have been set up for the selected/highlighted WorkItem.
    • You can configure by clicking on the ellipsis
  • Allocation Details*

    • In this field you will be able to configure the allocation for the WorkItem (if you are using allocation rules the most important field to have is the User Context Object)
    • You can configure by clicking on the ellipsis

Allocation Rules

We use allocation rules to make sure that WorkItems move into a pre-determined user’s list when these become active without the need to individually allocate WorkItems = automated traffic manager!

When we design a process we do not know who this user will be but we can use Allocation Rules to instruct the system to send a WorkItem to a pre-selected user’s Active WorkItems list.

  • So somewhere in the process, before the WorkItem where we’ve allocated ownership via allocation rules – a user has selected whom (within the role/team/department) that WorkItem will be automatically allocated - as will all others with the same set up.

In order to set up allocation rules we use:

  • User Context Objects
  • Allocation Triggers
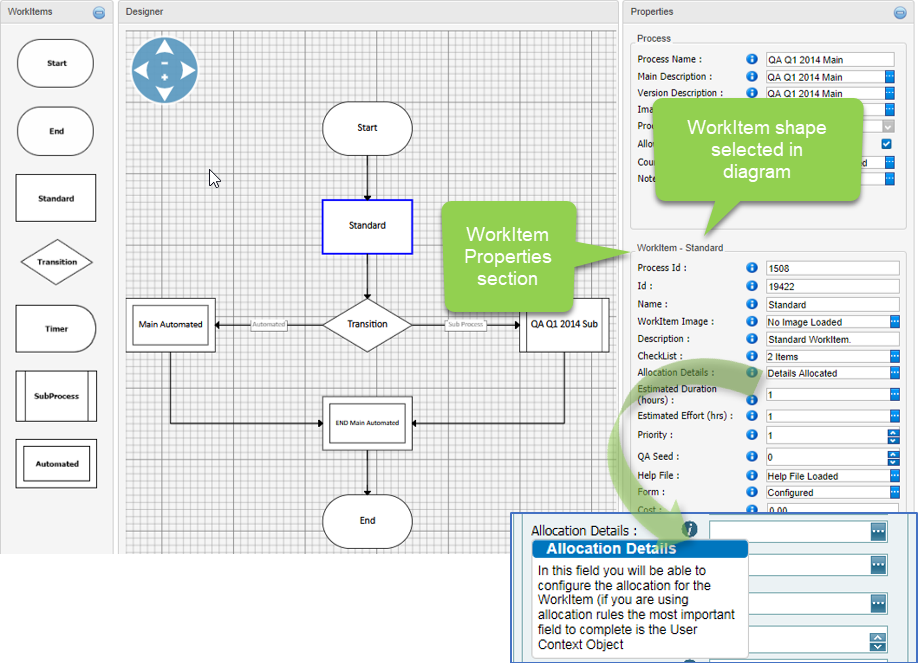
  • Allocation Details for WorkItems

What we need to know/do as a designer:

  • Know how many different User Context Objects we need to set up in the Custom Data Fields section
  • Know where we need to set up the Allocation Triggers (these are now automated – just check)
    • a preceding WorkItem form will need to request as mandatory the User Context Object(s)
  • Go through every Standard WorkItem and set up Allocation details by selecting the correct User Context object for each one.

This is how you will go about setting up allocation details

  • When you click on the Allocation details ellipsis, the Allocation Config loads
    • By default, the user allocated to the WorkItem is the Process Creator.
  • If you do not need specific allocation, just leave the fields blank, otherwise select an Allocated User/ User Context Object or User in a role
  • Allocated User
    • When activated the WorkItem will be allocated to the selected user
  • User Context Object
    • When activated the WorkItem will be allocated to the user that was selected in one of the preceding WorkItems
      • Answer to the User Context Object
  • User in a role
    • When activated the WorkItem will be allocated to the all users within the role
      • All users will have full access to the WorkItem (unless one user within the role takes ownership of the WorkItem – by removing the other users)

Allocation using User Context Objects & how to test

Role based allocation

  • Do NOT allocate WorkItems to Everyone as a role. The implication being that the WorkItems will be visible in the Active WorkItems list of every user in the WebPlatform!

Standard WorkItem

  • Estimated Duration (hours)

    • This is the calendar time required to execute any given task measured in hours. This means the length of time that might elapse before a user can complete the WorkItem (not to be confused with the estimated effort).
    • Configure by clicking on the ellipsis
  • Estimated Effort (hours)

    • Effort is the amount of time required to complete any given task measured in hours. In order to determine the task duration, the effort required to complete the task must be determined first
    • Configure by clicking on the ellipsis ...
  • Priority
    • Give a priority to your process.
  • QA Seed
    • Select the number of processes that can be instanced before a QA item is sent to the process owner.
  • Help File
    • If a help file has been created for the WorkItem you will see the name in the field.
    • You can configure by clicking on the ellipsis
  • Form
    • If a form has been created for the WorkItem you will see the name n the field.
    • You can configure by clicking on the ellipsis
  • Cost
    • You can allocate a cost to the WorkItem.
  • Allocation Trigger (Pre-selected for you)
    • Setting the Standard WorkItem as an “Allocation Trigger” will force the system to re-allocate the subsequent WorkItems in the process after this Workitem is completed
    • This means that the context object for allocation rules must be mandatory in this Standard WorkItem
    • The allocation details for Standard WorkItems have been set

Adding an image to your WorkItems

In the properties section for all WorkItems you will find: WorkItem Image

  • Browse for the image you want to use as the background for the selected WorkItem
  • Add Image
  • Wait for image to load
  • See background image with WorkItem Name text above

See WorkItem image(s) in Preview/Overview

Properties for a Start WorkItem

Properties you can change/update:

  • Name
  • Image
  • Description

Info icons:

  • If you hover over these you will find the definition for each one of the fields in the section

Allocation Trigger (pre-set for this WorkItem shape - reason why you do not have the field visible)

  • Having an “Allocation Trigger” for the Start WorkItem will instruct the system to re-allocate the subsequent WorkItems automatically in the process after this Workitem is completed
  • This means that the context object for allocation rules must be mandatory in the Start form
  • The allocation details for Standard WorkItems have been set
    • User Context Object
    • User in a role

Properties for a Timer WorkItem

  • Info Icons: If you hover over these you will find the definition for each one of the field

Properties you can change/update:

  • Name
    • Name of the WorkItem is what the users will see in the process diagram (this is truncated at 50 characters)
  • Time delay (hours)
    • This is the dynamic time delay. This means the length of time that must elapse before the next WorkItem becomes active

Properties for a Transition WorkItem

Info Icons: If you hover over these you will find the definition for each one of the fields

Properties you can change/update:

  • Name
    • Name of the WorkItem is what the users will see in the process diagram (this is truncated at 50 characters)
  • Transition Details
    • If you click on the ellipsis you can configure or see current configuration in the Transition Setup tab

Properties for an Automated WorkItem

  • Info Icons: If you hover over these you will find the definition for each one of the fields
  • Name
    • Name of the WorkItem is what the users will see in the process diagram (this is truncated at 50 characters)
  • Configured
    • This status will let you know if it has been set up already
    • If you click on the ellipsis you can configure or see current configuration in the Automated Item Designer tab
  • Allocation Trigger
    • Setting the Automated Item as an “Allocation Trigger” will force the system to re-allocate the subsequent WorkItems in the process after this Workitem is completed (email successfully sent)
    • This means that the fields for the allocation rules must be mandatory in the preceding Standard or Start WorkItem
    • The allocation details for Standard WorkItems have been set

Properties for a SubProcess WorkItem

  • Info Icons: If you hover over these you will find the definition for each one of the fields

Properties you can change/update:

  • Name
    • Name of the WorkItem is what the users will see in the process diagram (this is truncated at 50 characters)
  • SubProcess ID
    • The process to use as the subprocess is visible/selectable here
    • Dropdown box contains all current live procesess
  • Execution Mode
    • Default is SYNC
  • Allocation Trigger
    • Setting the Transition WorkItem as an “Allocation Trigger” will force the system to re-allocate the subsequent WorkItems in the process after this Workitem is completed
    • This means that the fields for the transition & allocation rules must be mandatory in the preceding Standard WorkItem
    • The allocation details for Standard WorkItems have been set
help_outline
close