menu

WebPlatform Documentation

Process WorkItem Editor

download

Process/WorkItem Editor

Why is Process/WorkItem Editor so important?

It’s where you will spend most of your time as a designer!

Click on the Process/WorkItem Editor button, then you will be able to:

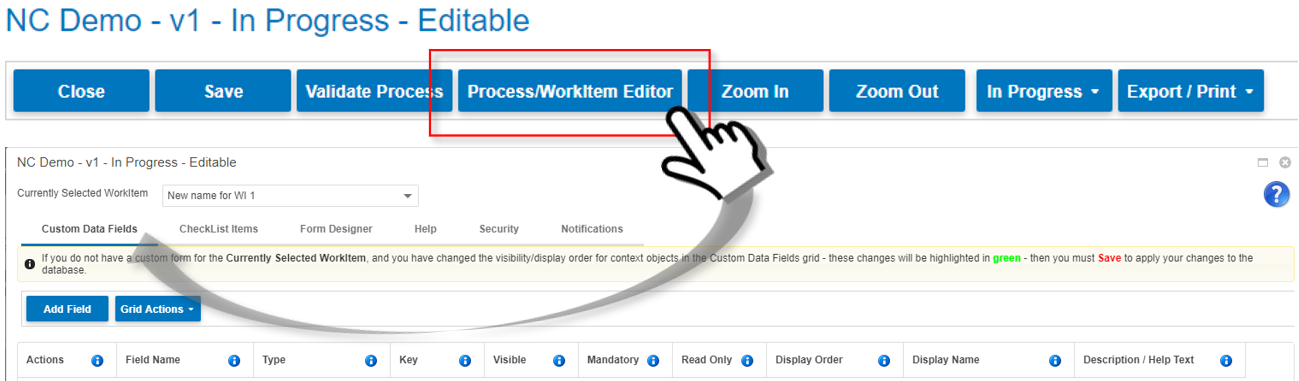
  • Select the WorkItem you want to edit
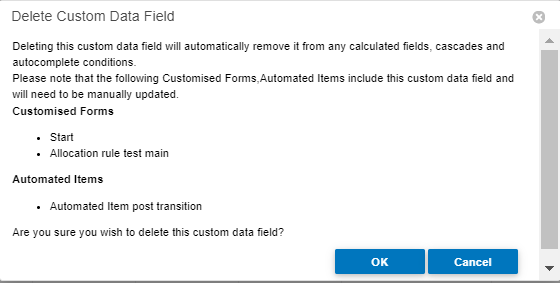
  • Add context objects in Custom Data Fields
    • these enable data capture for the process
  • Create user friendly forms for each WorkItem in Form Designer
  • Create Checklists & Help content
  • Set up Security levels for the process
  • Set up Access Control (at WorkItem & Process Level)
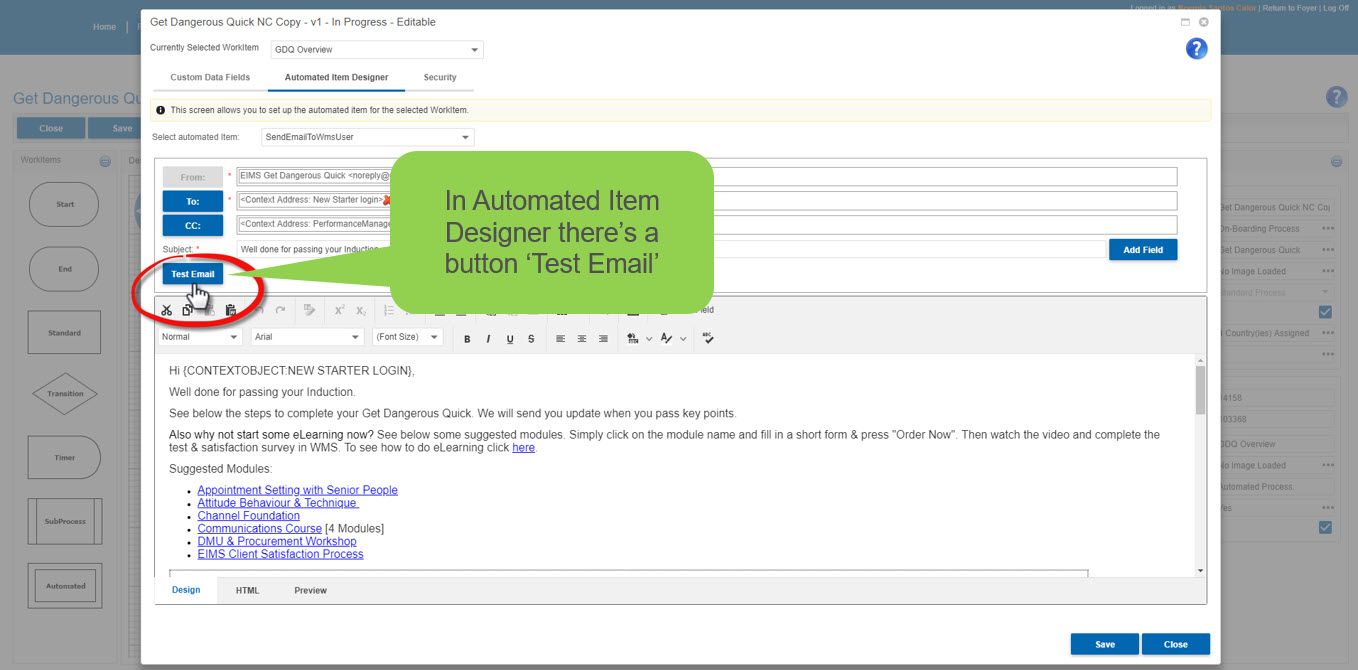
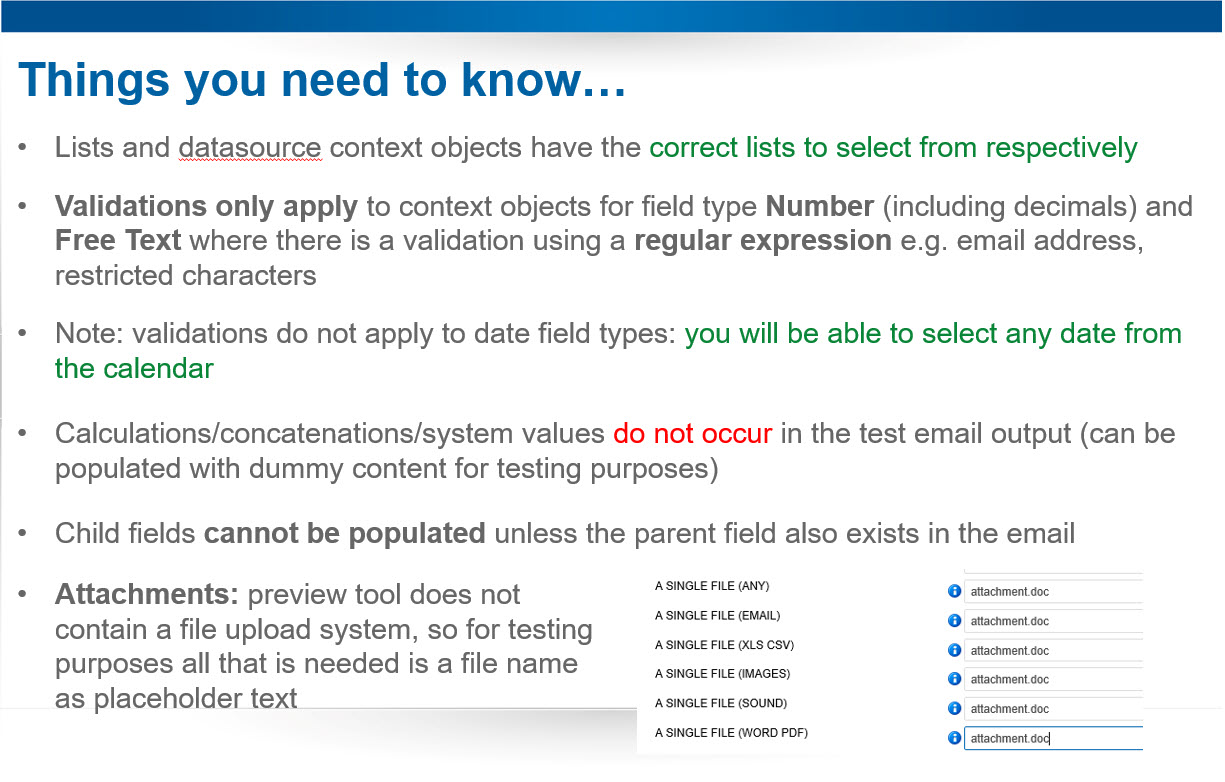
  • Create Notifications & Automated emails
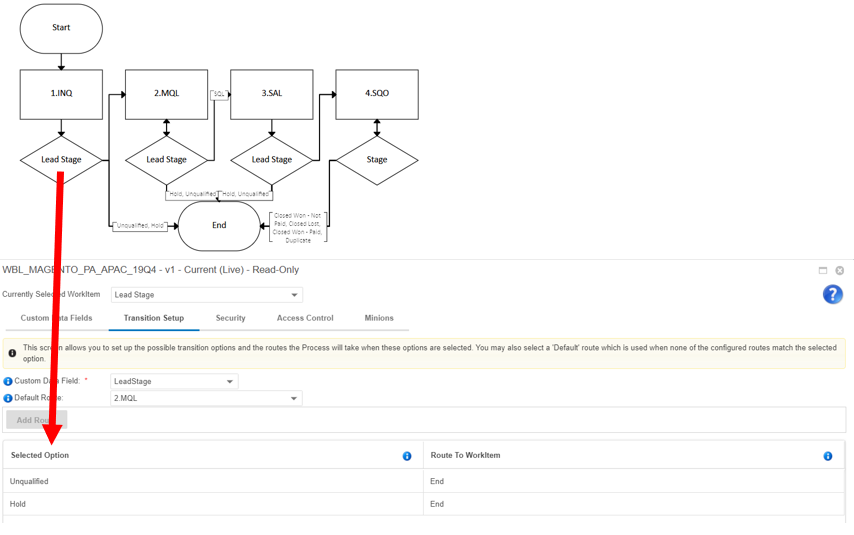
  • Set up Autocomplete rules for your WorkItems
  • Set up Minions for your process
  • Make updates in bulk

Custom data fields: field types available

  • Context Object types available to use for Standard Processes:
  • Free Text
  • Number
  • Date
  • Boolean (True|False)
  • A Single File
  • One or More Files
  • Concatenated Value
  • List (User can add new values)
  • Fixed list (Non-Editable)
  • List from a Data Source (User can add new values)
  • Fixed List from a Data Source (Non-Editable)
  • Fixed List of values and descriptions (Non-Editable)
  • User Context Object
  • System Context Object
  • Rich Text Values
  • Calculated Data

Deleting Context Objects

When you delete a Context Object (data field) a pop up will appear that will let you know where the Context Object has been used in the process:

  • (List of) WorkItems
  • (List of) Automated Emails

So it is the designer's responsibility to fix and have the pop up state that the context object is not in use in the process before committing to delete the context object!

Best practice:

  1. Click Delete
  2. Take a note of all references to where the Context Object has been used
  3. Click Cancel
  4. Go into all referred WorkItem forms & Automated items and delete the Context object (this also makes sure you do not compromise the message you wanted to relay to users in the first place!)
  5. Go back to the Custom Data Fields grid, click Delete again
  6. If your warning is clear, Click OK to delete the Context Object

Example of a warning for deleting a Context Object.


Custom data fields: Bulk updates for context objects

  • In the Custom Data Fields tab we can update the following fields in bulk, then just click Save:
    • Field Name
    • Display Order
    • Display Name
  • Once a field is touched it will be highlighted in green
  • Upon Save all changed text will no longer be highlighted

Note: Descriptions cannot be updated in bulk (because html tags can corrupt the field & break your process)

Custom data fields: Display Order for context objects

  • You can control the order in which context objects are visible at the start of the process & for each WorkItem
    • Note that you can not use this functionality if you have customised the form
  • In custom data fields grid, change the Display Order column number for the context objects
    • so that the order these appear in the form is the one you want instead of the default order in which the CO were added
  • Save once you have made all your changes

Click on Form designer to confirm the CO are listed as per the display order you saved

Note: In Start WorkItems you can not have read only status!

Custom data fields: Visibility for context objects

  • You can control the context objects that are visible at the start of the process & for each WorkItem
    • Note that you can not use this functionality if you have customised the form
    • In custom data fields grid, tick the visibility setting you want for each WorkItem
    • Visible
    • Mandatory (tick visible & mandatory)
    • Read-only (tick visible & Read Only)
  • All changes will be highlighted in green
  • Click Save to bulk update

You will see your selected context objects with a Display Order number at the top of the list

  • You can change the order of context objects, just update the numbers and save

Security

Where you can set up the access level/rights to your process (security settings)

  • Process Design Access:
    • To identify who can make changes to the process design/context objects (modify the process) & cut new versions live
  • Process Instance Access:
    • To identify which roles can start/order an instance of the process

Note: If you do not select any user with Process Instance Access then no-one will be able to see your process in WMS/Start Process

Save your settings, then Close

Access Control

Checklist Items

Where you can create or edit a checklist for the users to complete

  • Standard WorkItems only for Process Type = Standard Process

In ‘CheckList Items’ tab

  • Click ‘Add Item’ to add entries
  • Hyperlinks must start with http…
  • Save your items when ready

Once an item is added it can be moved up/down and edited

  • You can also delete incorrect items by clicking the delete icon

Save changes when finished

Note: Lengths supported for fields are: Item name (30 chars max), Description (250 chars max), Hyperlink (150 chars max)

Help

Where you can create or edit the help file for your Standard WorkItem

  • Free style (type into the Design box) or use beautification html
  • To re-use an existing Help File click on ‘Copy From’
    • Select the process
    • And the WorkItem you wish to copy help from
    • Once content is copied you can go ahead and edit to customise for the WorkItem you are on
  • If you have the content HTML you can paste it directly into the HTML tab
    • Edit/Update through HTML view (if you prefer to use this option instead HTML knowledge is required)
  • You can Preview your Help File to see how it will look to users

Save once you have added and checked all of your content

Close

Note: There are no default help files as this content needs to be specific to each WorkItem.

Help: Adding images – why use assets?

Best practice is to use content from Asset Manager = Central Repository

  • Makes re-use & maintenance easy (has a link that will always render the very latest asset uploaded)

This means you do not need to update every help file with an image if it needs to be updated….

However if you do not want to use images from Asset Manager:

  • Click on the Insert Image icon
  • The Insert Image pop up box will appear with these options:
    • From your computer
      • Just Browse for the image you want, or drag and drop into the preview box
      • Click OK, check & Save
    • From the web (URL)
      • Just add the URL for the image you want to use
      • Preview
      • Update options if required
      • Click OK, check & Save

How to change an image?

  • Simply replace the asset number in the HTML tab!

Help: Adding links

Adding or Editing Links

  • Click on the Insert Link icon
  • The Insert Link pop up box will appear
  • For Emails fill in:
    • E-mail to: as applicable
    • Subject (Subject line for the email)
    • Text (as you want the user to see the hyperlink)
    • ToolTip
    • Click OK, check & Save
  • For URL fill in:
    • URL (http//www.....)
    • Text (as you want the user to see the hyperlink)
    • ToolTip
    • Always* Tick ‘Open in new window’
    • Click OK, check & Save

Always test links in ‘Preview’

* Reason why? So that the user can return to the page where they were with no issues once they’ve been sent to your URL


Checklist for when you’re re-using HTML for Help

Automated Item

Configuring Automated Items = Emails

  • Click on the ‘Configured’ ellipsis or ‘Process/WorkItem Editor’
    • This will open the Automated Item Designer
  • Select ‘SendEmailToWmsUser’
  • The configuration page will load
  • Update ‘Configure Email’ section

    • From (Name & Email), To & CC
    • Use ‘Add User’ to: use Process Creator, Owner or Requester. Or to Add a Custom Email address, Select a User Allocated to a WorkItem in the process or an email address in a context object (Regular Expression set up)
    • Subject
      • Use ‘Add Field’ to add context objects / process fields
  • Update ‘Configure Email Content’ section
    • Use beautification template
    • Make sure images/ logos are assets
    • Add relevant text
    • Click Save then Preview
  • Test email once configured

Process designer allows the user to send a test email for notifications and automated items

Things you need to know...

How to 'test' an email

Example: Test Emails (email address regular expression)

  • User can test without filling in any field
    • Just click ‘Send’
  • Where Field Type = Free Text
    • with validation using regular expression = email address
  • If user tests by adding anything other than an email address the test email will not be sent until fixed

Example: Test Email (numbers/decimals)

  • Where Field Type = Number
  • If user tests by adding anything other than a number or decimal the test email will not be sent until fixed

Example: Many Context Objects

  • All possible context objects are populated, except:
    • Concatenations
    • Calculations
    • Child Fields
  • You can see in the output email the above fields are not automatically populated (although all fields used in set up are)

Notifications

Designer users can setup email notifications in 'Standard' and 'Timer' WorkItem types for when the WorkItem becomes Active, overdue or has been completed

Creating a new notification

  • Select or confirm the WorkItem
  • Select ‘Add New’ on the Notification tab
    • Pop up appears for you to create a new notification
  • Type a Name for the Notification
  • Select what event type will trigger this notification. Selectable options are:
    • WorkItem Activated - A notification for when the WorkItem becomes Active
    • WorkItem Completed - A notification for when the WorkItem is completed
    • WorkItem Overdue - A notification for when the WorkItem is overdue
  • Trigger After – How long after the event should the notification be sent?
    • 1 Unit = 24 hours
    • Leave this value at 0 if you want the notification to be sent immediately once the event is reached

Setting up the notification: Configure email content (same as automated item)

  • Configuring Email Content= Emails

    • When creating or editing a notification event, the user is also asked to create/ edit the Email content for the event
    • The configuration page will load
      • Update ‘Configure Email’ section
        • From (Name & Email)
        • To & CC (Name & Email)
          • Click ‘To / CC’ to: use Process Creator, Owner or Requester. Or to Add a Custom Email address (an email that is not linked to a WebPlatform user), Select a User Allocated to a WorkItem in the process or an email address in a context object (Regular Expression set up)
        • Subject
          • Use ‘Add Field’ to add context objects / process fields
            • The insert field pop up will load and you can select the context object/field you want to add
      • Update ‘Configure Email Context’ section
        • Add text, table, images, links etc
        • Change foreground colour (font)
        • Check your work
        • Click Save then Close

Viewing a notification

  • You can view an existing notification
  • To do this you need to go to the Process/ WorkItem Editor
  • Select or confirm the WorkItem
  • Go to the Notification tab and select the relevant notification from the dropdown
  • The existing email configuration will come up in the window
    • The content is in a read only view
  • Click on the view button to see the existing settings
    • The content is in a read only view

Editing a notification

  • You can modify an existing notification
  • To do this you need to go to the Process/ WorkItem Editor
  • Select or confirm the WorkItem
  • Go to the Notification tab and select the relevant notification from the dropdown
  • The existing email configuration will come up in the pop up
    • Edit as appropriate
  • Click on the edit button to change the existing settings
    • Edit as appropriate
  • Once the changes have been made you need to save
  • Validate and Cut the process live for the changes to be live too

Deleting a notification

  • You can delete an existing notification
  • To do this you need to go to the Process/ WorkItem Editor
  • Select or confirm the WorkItem
  • Go to the Notification tab and select the relevant notification from the dropdown
  • The existing email configuration will come up in the pop up
  • Click on the delete button
  • Confirm that you wish to delete the notification
  • Once the changes have been made you need to save
  • Cut the process live for the changes to be live too

Notifications Example: All Context Objects

  • Same principle applies as in automated emails
  • Example where all context objects have been populated
    • Concatenations
    • Calculations
    • Child Field (as parent exists in the field list)

How to add a link to a WorkItem

In Insert Fields the designer has the option to Select a new Category ‘WorkItem Link’.

The WorkItem names are listed in the Field Name column for this new Category.

Best practice: Only add links to an active WorkItem in the process as there is no value sending a user to an inactive WorkItem

The user experience: When the recipient clicks on the link in the email, he/she will be taken directly to the WorkItem.

Transition Editor

A Transition is a Decision point.

To begin with set up context object(s) where Field type = Non-Editable Fixed List of Values or Fixed List of Values and Descriptions

  • This list of values will be the number of routes the transition can take
  • If Multi-Select is ticked the process can follow multiple paths simultaneously

Note: You can only draw connectors to a Transition (entry points). All connectors from the Transition (exit points) must be done via the Transition Setup tab for your process to work properly.

Configuring Transitions:

  • In Transition Properties click on Transition Details/or select the WorkItem in Process WorkItem/Editor
  • Then select the Custom Data Field = transition context object
    • Set a default route (not mandatory)
  • Click Add Route
    • Select the option (route = as set up in the context object type: Non-Editable Fixed List of ValuesFixed List of Values and Descriptions)
    • Select the ‘Route to WorkItem’ from the list of WorkItems in the design
  • Once you have finished, Always Save your work
  • The routes you saved will be visible in the process design as per your instruction in the Transition Setup

Transitions: Why using datasource field types is a risk

  • In transition details we need to code where each option needs to go next
    • route to follow
  • A datasource can be constantly updated/changed which would mean that the values within the datasource cannot be coded at design stage….the process would break all the time!

If you have no choice but to use this field type then make sure you set up a default route to catch all changes in the datasource.

Default Route - What you need to know

  • This is the route that the transition will exit if the selected option is not configured
  • This is a fail safe measure
    • Meaning: in the transition context object, if an option doesn’t have a route to a WI configured, the system will automatically route to the WorkItem you identified as the Default Route.
  • This is visible in the diagram as an additional connector from the transition


Not to be confused with ‘Critical Path

  • This is the longest possible path the process can take, including all slippages and re-routes
  • Normally visible to users as the red path in the process diagram pages

Default Route Example

In the digital process the first lead stage transition states that if the selected value is 'Unqualified' or 'Hold' the process goes to end

Otherwise, it always goes to the WI 2. MQL

What you could have done

See below a comparison between the transition set up for the same field:

Timer

Timers are used to delay the next action in a process

Note: Minimum length of time that can be used is 0.25 = 15 minutes.

To set up details for your Timer:

  • Click on the Time Delay ellipsis
    • The Dynamic Time Delay pop up box will appear
  • Add Estimated Duration
    • 1 unit = 1 hour
    • 24 units = 1 day (24 hours)
  • Always Save Changes

There is functionality to have variable lengths of time

  • Action: Multiply or Divide
  • Context object
    • selected from context objects set up as type = Number Value
help_outline
close